
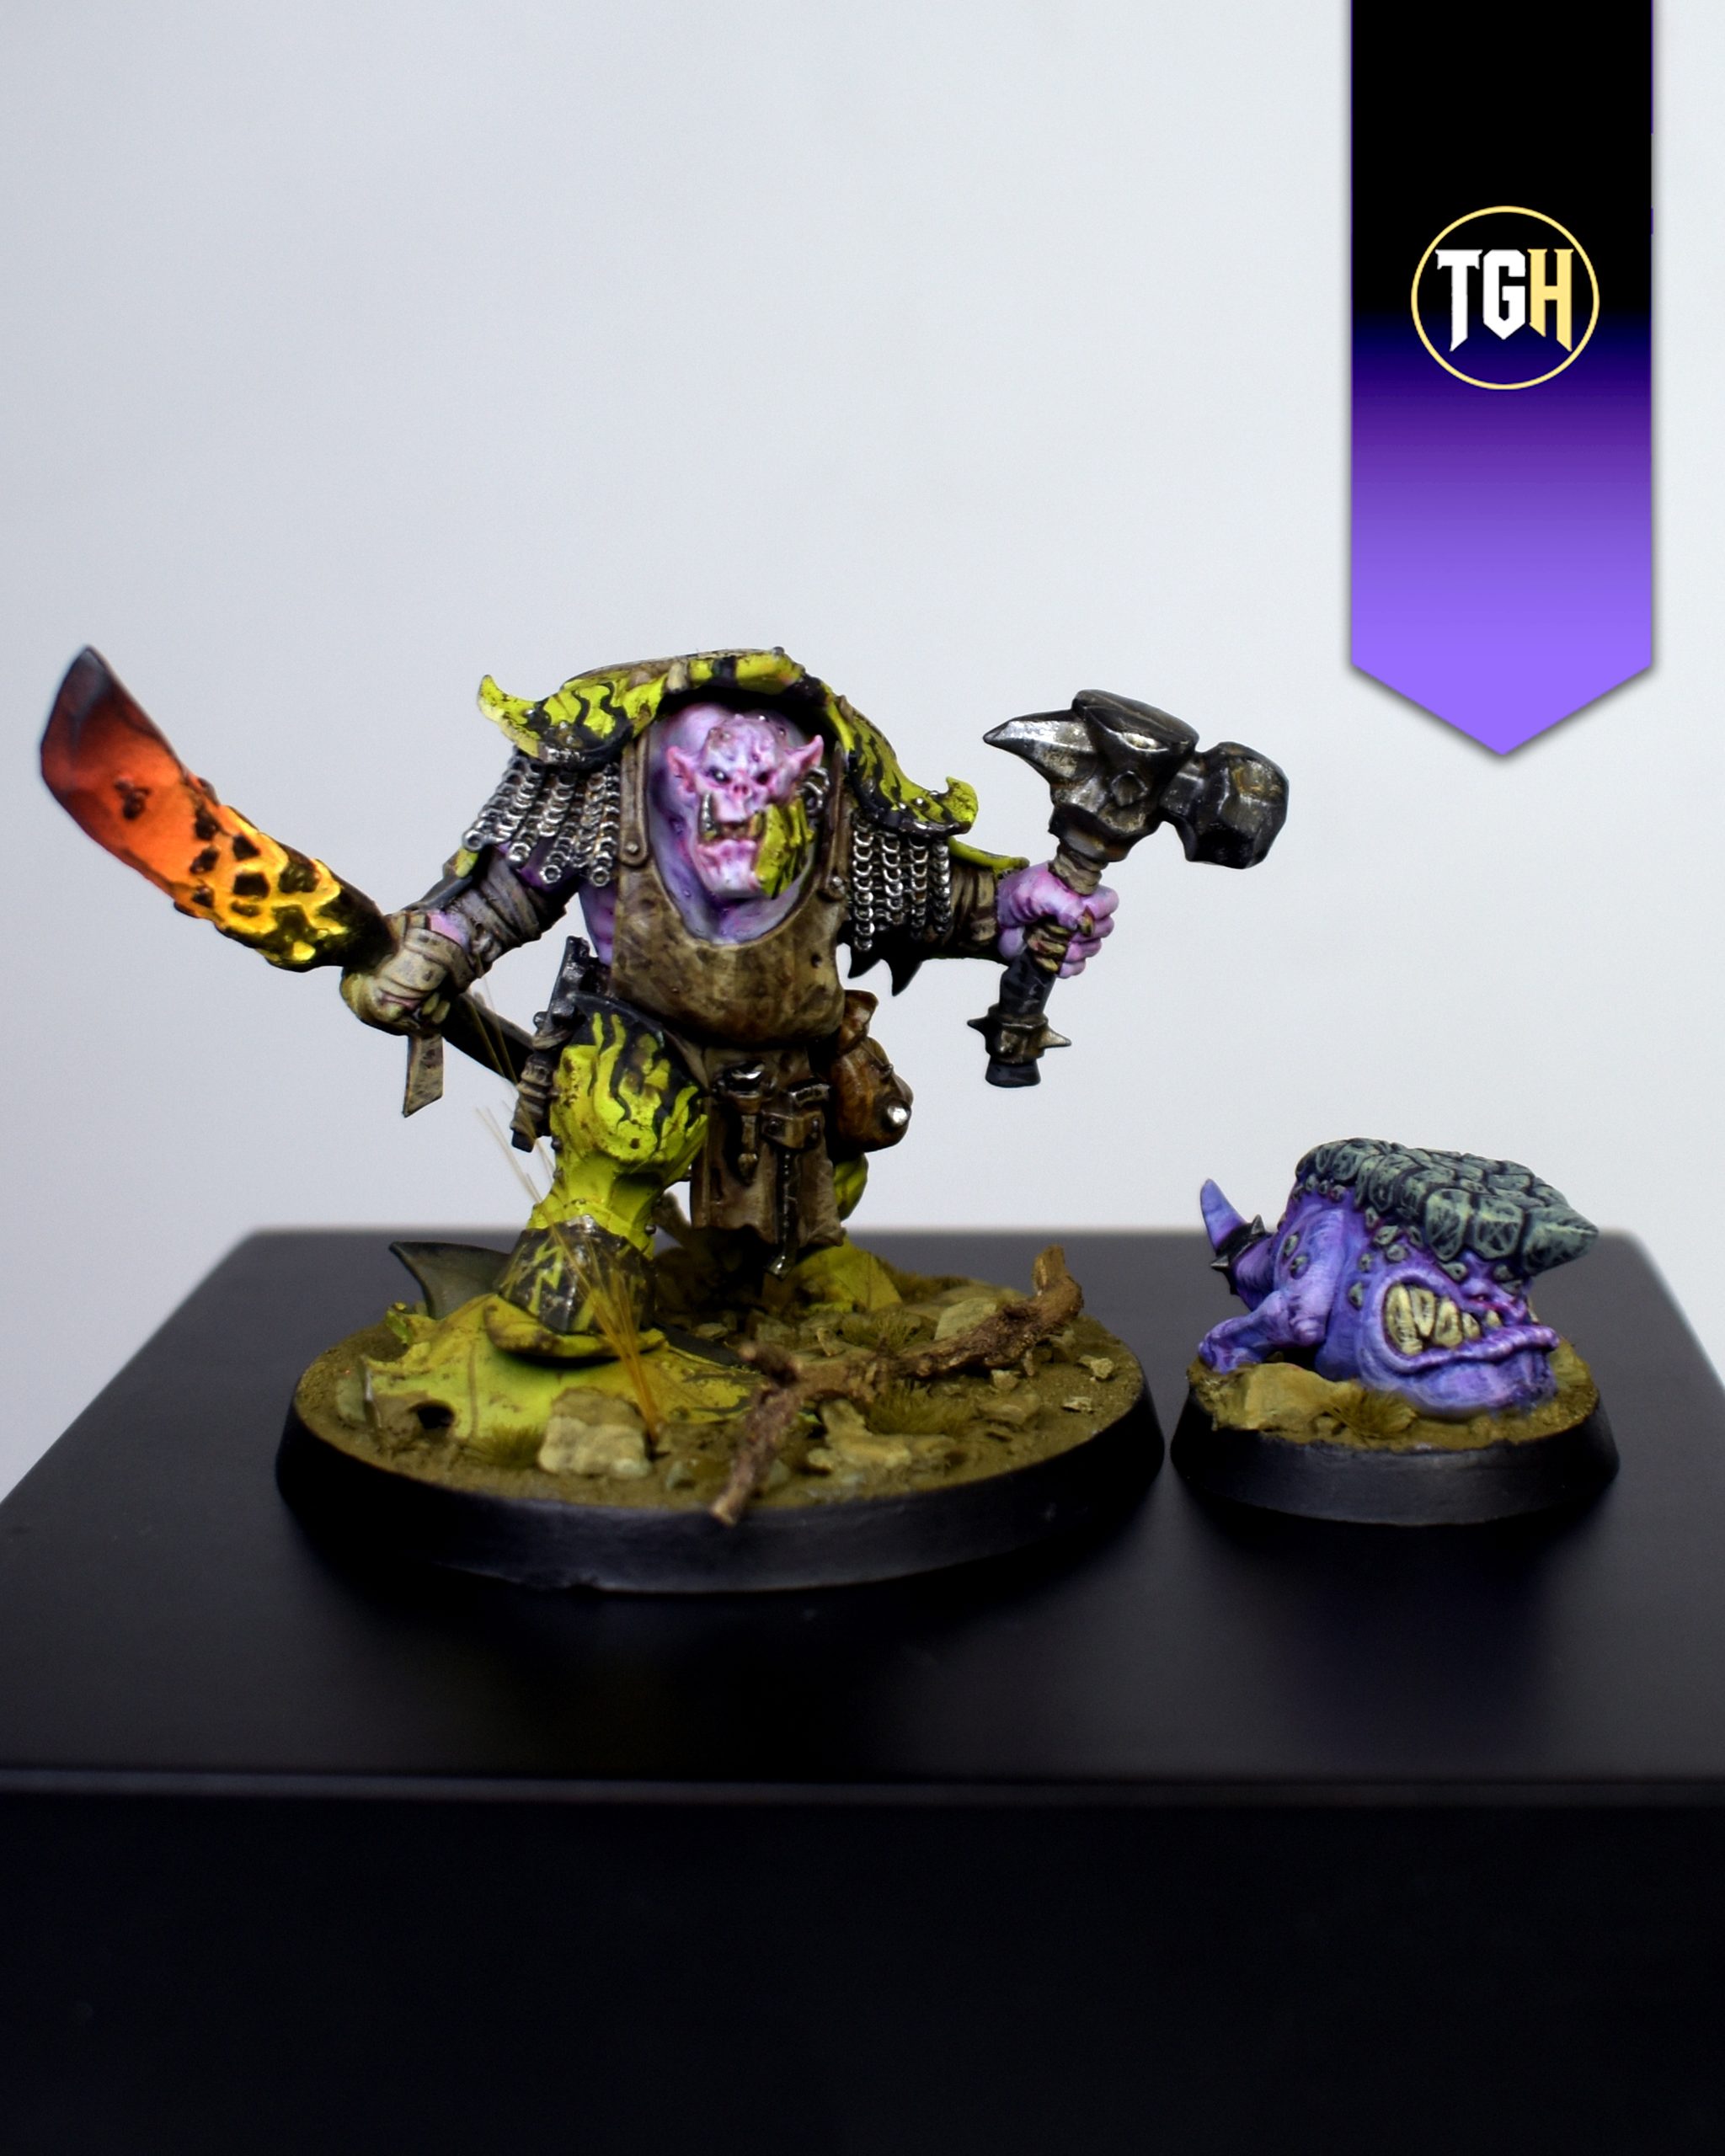
Painting Guide: Zoggrok Anvilsmasha, Step by Step

Hello, Generals! Here I am again, sharing another painting tutorial on the blog. This time, it features a miniature from a Green Skin (or in this case, Purple Skin) army: the Ironjawz! And for the first time, I’m posting my step-by-step guide for painting armor and skin here (since I haven’t published it anywhere else yet) so I hope you like it.
If you want to see the other miniatures I’ve painted for my Ironjawz army, check out my Instagram: @ekkius
Without further ado, let’s get started!
Priming
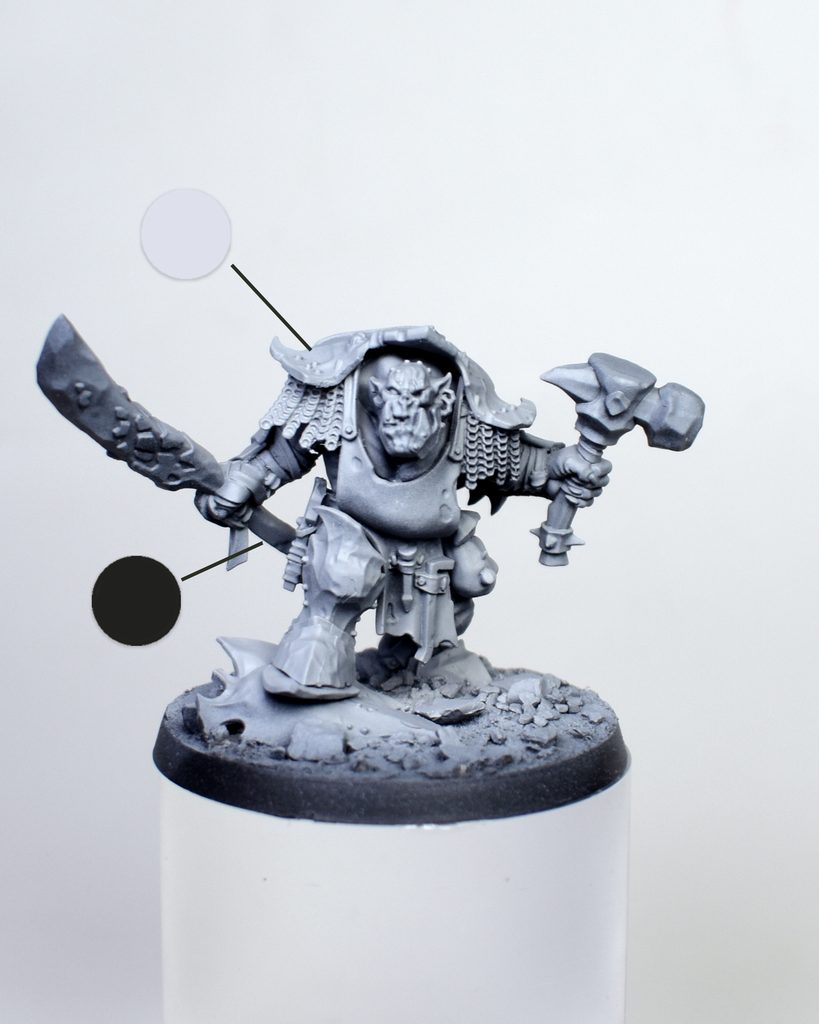
For the primer, I’ll use a two-coat primer. First, I’ll cover the entire miniature with black, and then with white. To do this, I’ll use the Ionic-0340 Black and Ionic-0341 White primers, applied with an airbrush.
Base (Airbrush)
When painting an army like this, where certain surfaces dominate, such as the armor on the Ironjawz, if you have an airbrush, it’s best to use it to paint these areas and cover as much surface area as possible. Doing so will save you valuable time.
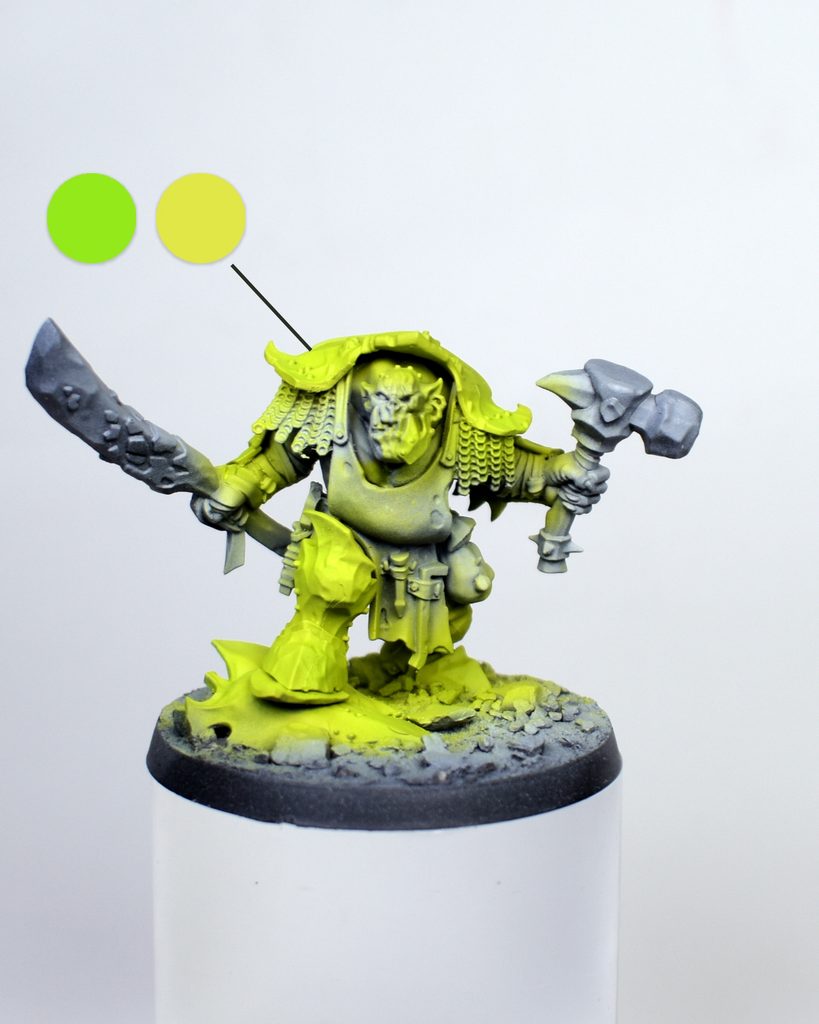
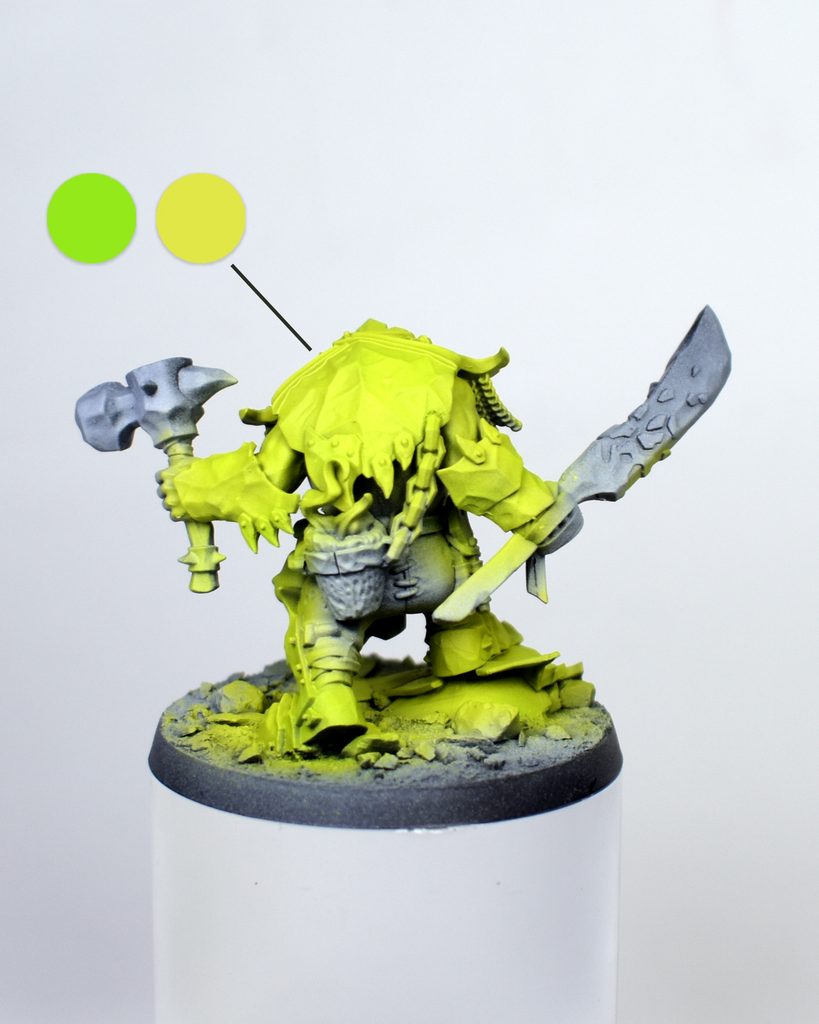
For my part, after applying this double coat of primer, I’m going to start by airbrushing Ionic-0132 Acid Green, over which I’ll then apply a very thin layer of Amsterdam Reflex Green to give it that green hue and extra color saturation thanks to the fluorescent paint. After that, I’ll begin painting with a brush.
Base (Brush)
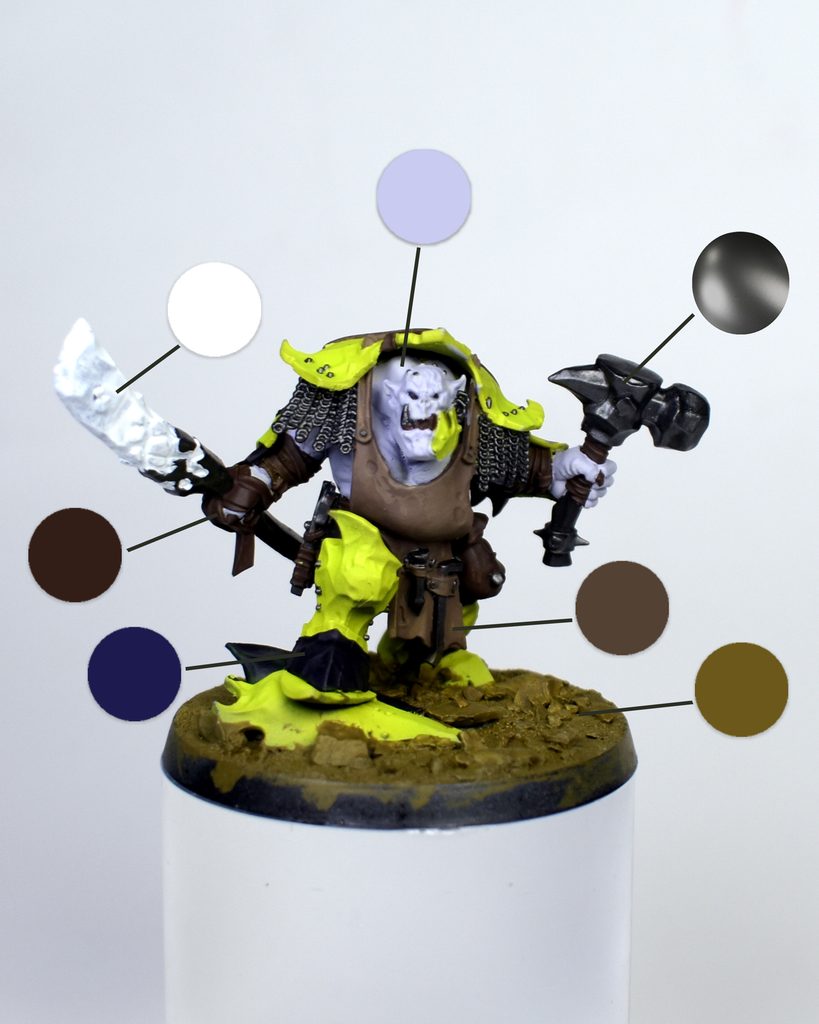
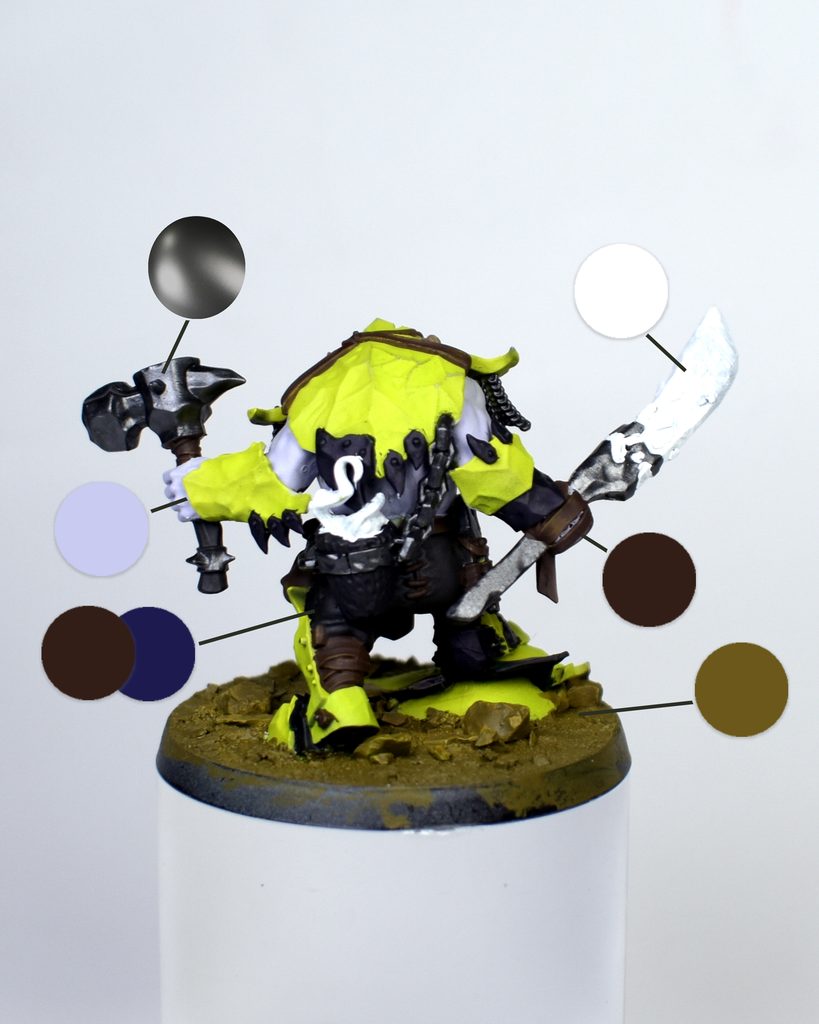
I continue painting the other elements, this time with a base coat applied with a brush.
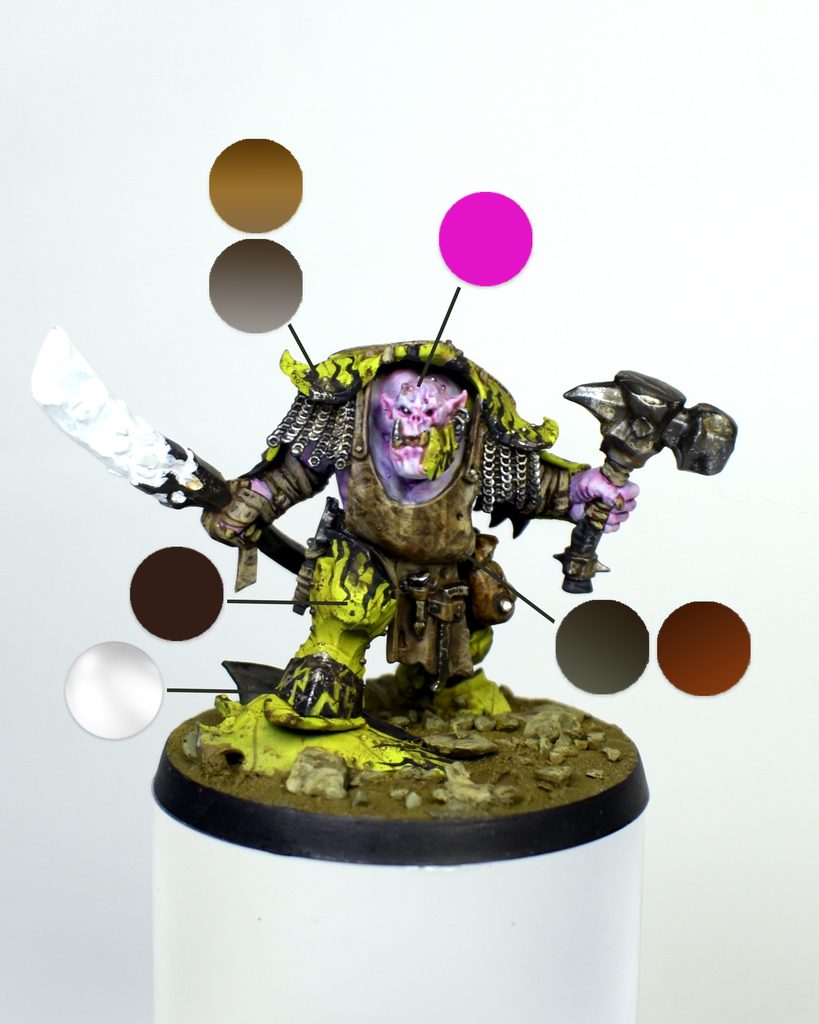
For the skin, I’ll use Ionic-0085 Smoke Grey.
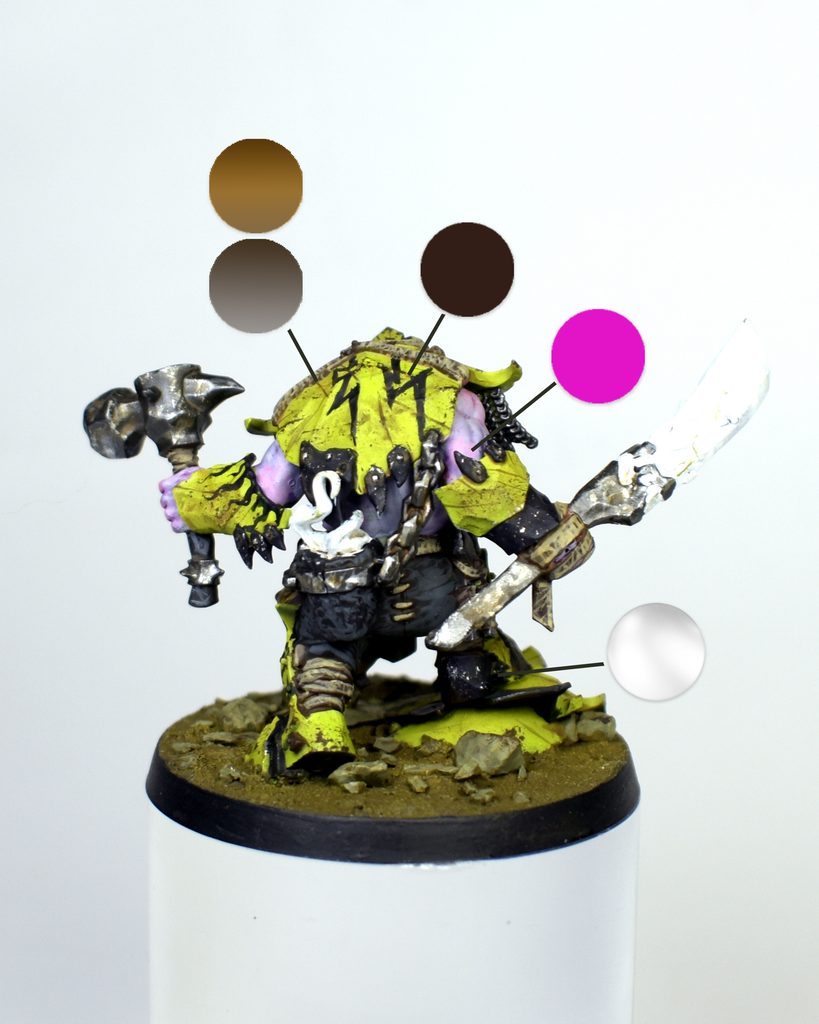
For the pants, I’ll use a 1:1 mix of Ionic-0171 Dark Grey and Ionic-0161 Burnt Umber.
I’m using this same Ionic-0161 Burnt Umber to paint the boot laces, the small cloth pouch, the shoulder straps, and the belt, as well as the nails and teeth. For the metal parts, I used Ionic-0173 Black Metal, and some elements of the armor were painted using Ionic-0171 Dark Grey. The apron was painted using Ionic-0148 Graveyard Earth, and the sword and the flame on the back were given a coat of white to make the fire colors we’ll apply later stand out more.
I finished by painting the base with Ionic-0147 Brown Green.
Highlights
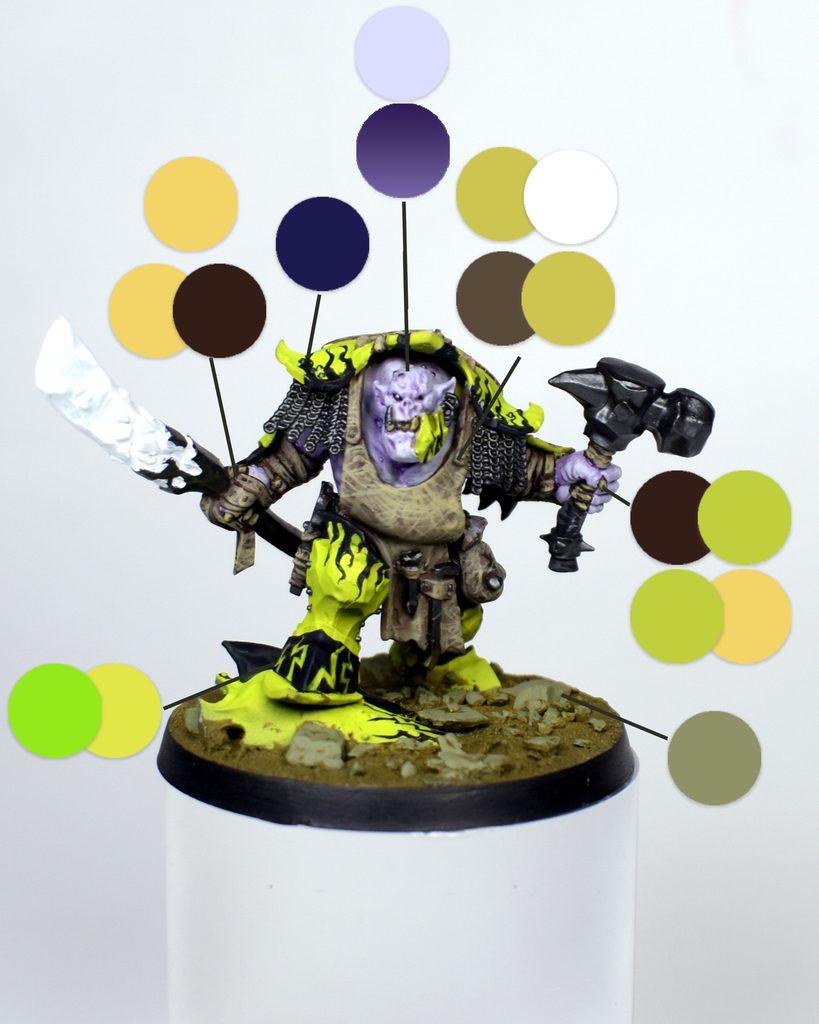
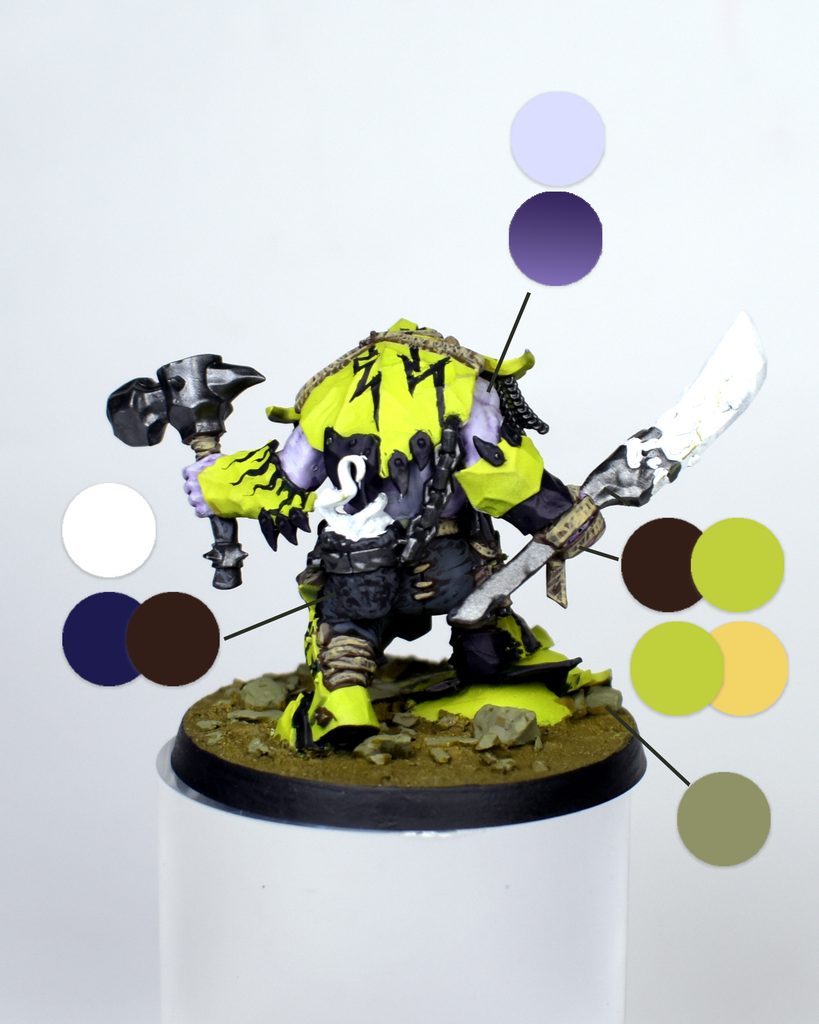
I highlighted the miniature’s straps first with a 1:1 mixture of Ionic-0161 Burnt Umber and Ionic-0029 Golden Flesh, and then used only Ionic-0029 Golden Flesh in smaller quantities to create greater contrast.
For the apron, I used a 1:1 mix of Ionic-0148 Graveyard Earth and Ionic-0143 Tombstone Yellow, finishing with the same Ionic-0143 Tombstone Yellow mixed with a little white; I applied the paint in fine strokes to create that weathered texture.
The nails and teeth were painted by outlining them with a 1:1 mixture of Ionic-0161 Burnt Umber and Ionic-0017 Plasma Green, and then highlighted with Ionic-0017 Plasma Green mixed with Ionic-0029 Golden Flesh in a 1:1 ratio.
The pants were highlighted by adding white to the initial mixture of Ionic-0171 Dark Gray and Ionic-0161 Burnt Umber.
Lightning and flame motifs were painted on the armor; the yellow areas were painted with Ionic-0171 Dark Gray, and in the dark areas with a 1:1 mix of Ionic-0132 Acid Green and Amsterdam Reflex Green. When freehand painting, be sure to thin the paint a little more than usual, since you don’t want the paint to cover the surface, you want it to glide easily over the miniature.
On the base, the stones were painted with Ionic-0146 Rock Grey.
Finally, a wash of Citadel Contrast Magos Purple, slightly diluted with water, was applied to the surface, focusing mainly on areas with internal contours to create depth. These surfaces were then lightly cleaned with a fresh coat of Ionic-0085 Smoke Grey.
Weathering and Shades
On the greenish areas of the armor, I apply Ionic-0161 Burnt Umber with a sponge, wiping off a lot of the paint onto a piece of paper to create a sort of “dry brush” effect. This will create micro-textures that add realism and weathering to our armor quickly and with random patterns that would be very difficult to replicate with a brush. For the dark areas, instead of using brown, I’m going to use Ionic-0175 Silver, since it will provide much more contrast and better highlight the chipped texture we want to depict.
On the armor panels and metal elements, I apply a diluted wash of Titan Natural Earth Shadow oil paint and Ammo Oilbrusher Red Tile, both thinned with Ammo Enamel Thinner. This will add a bit more depth and contrast to the pieces. After it dries, I’ll add some additional weathering in the form of chipping and lines on the greenish part of the armor using Ionic-0161 Burnt Umber.
On the apron, I’ll apply various strokes using Citadel Contrast Ratling Grime and Ionic-0380 Mahogany.
As for the skin, I use diluted Amsterdam Reflex Rose to paint areas such as the knuckles, fingers, mouth, nose, eyes, and ears of our Ironjaw.
Sword and Base
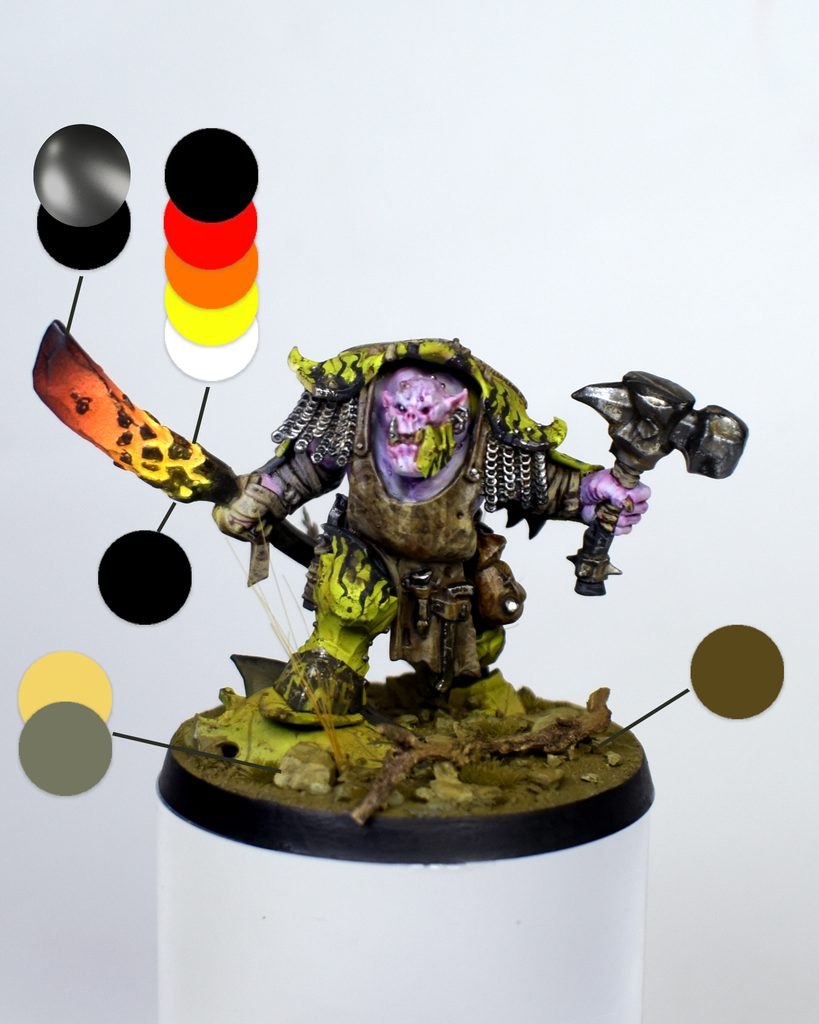
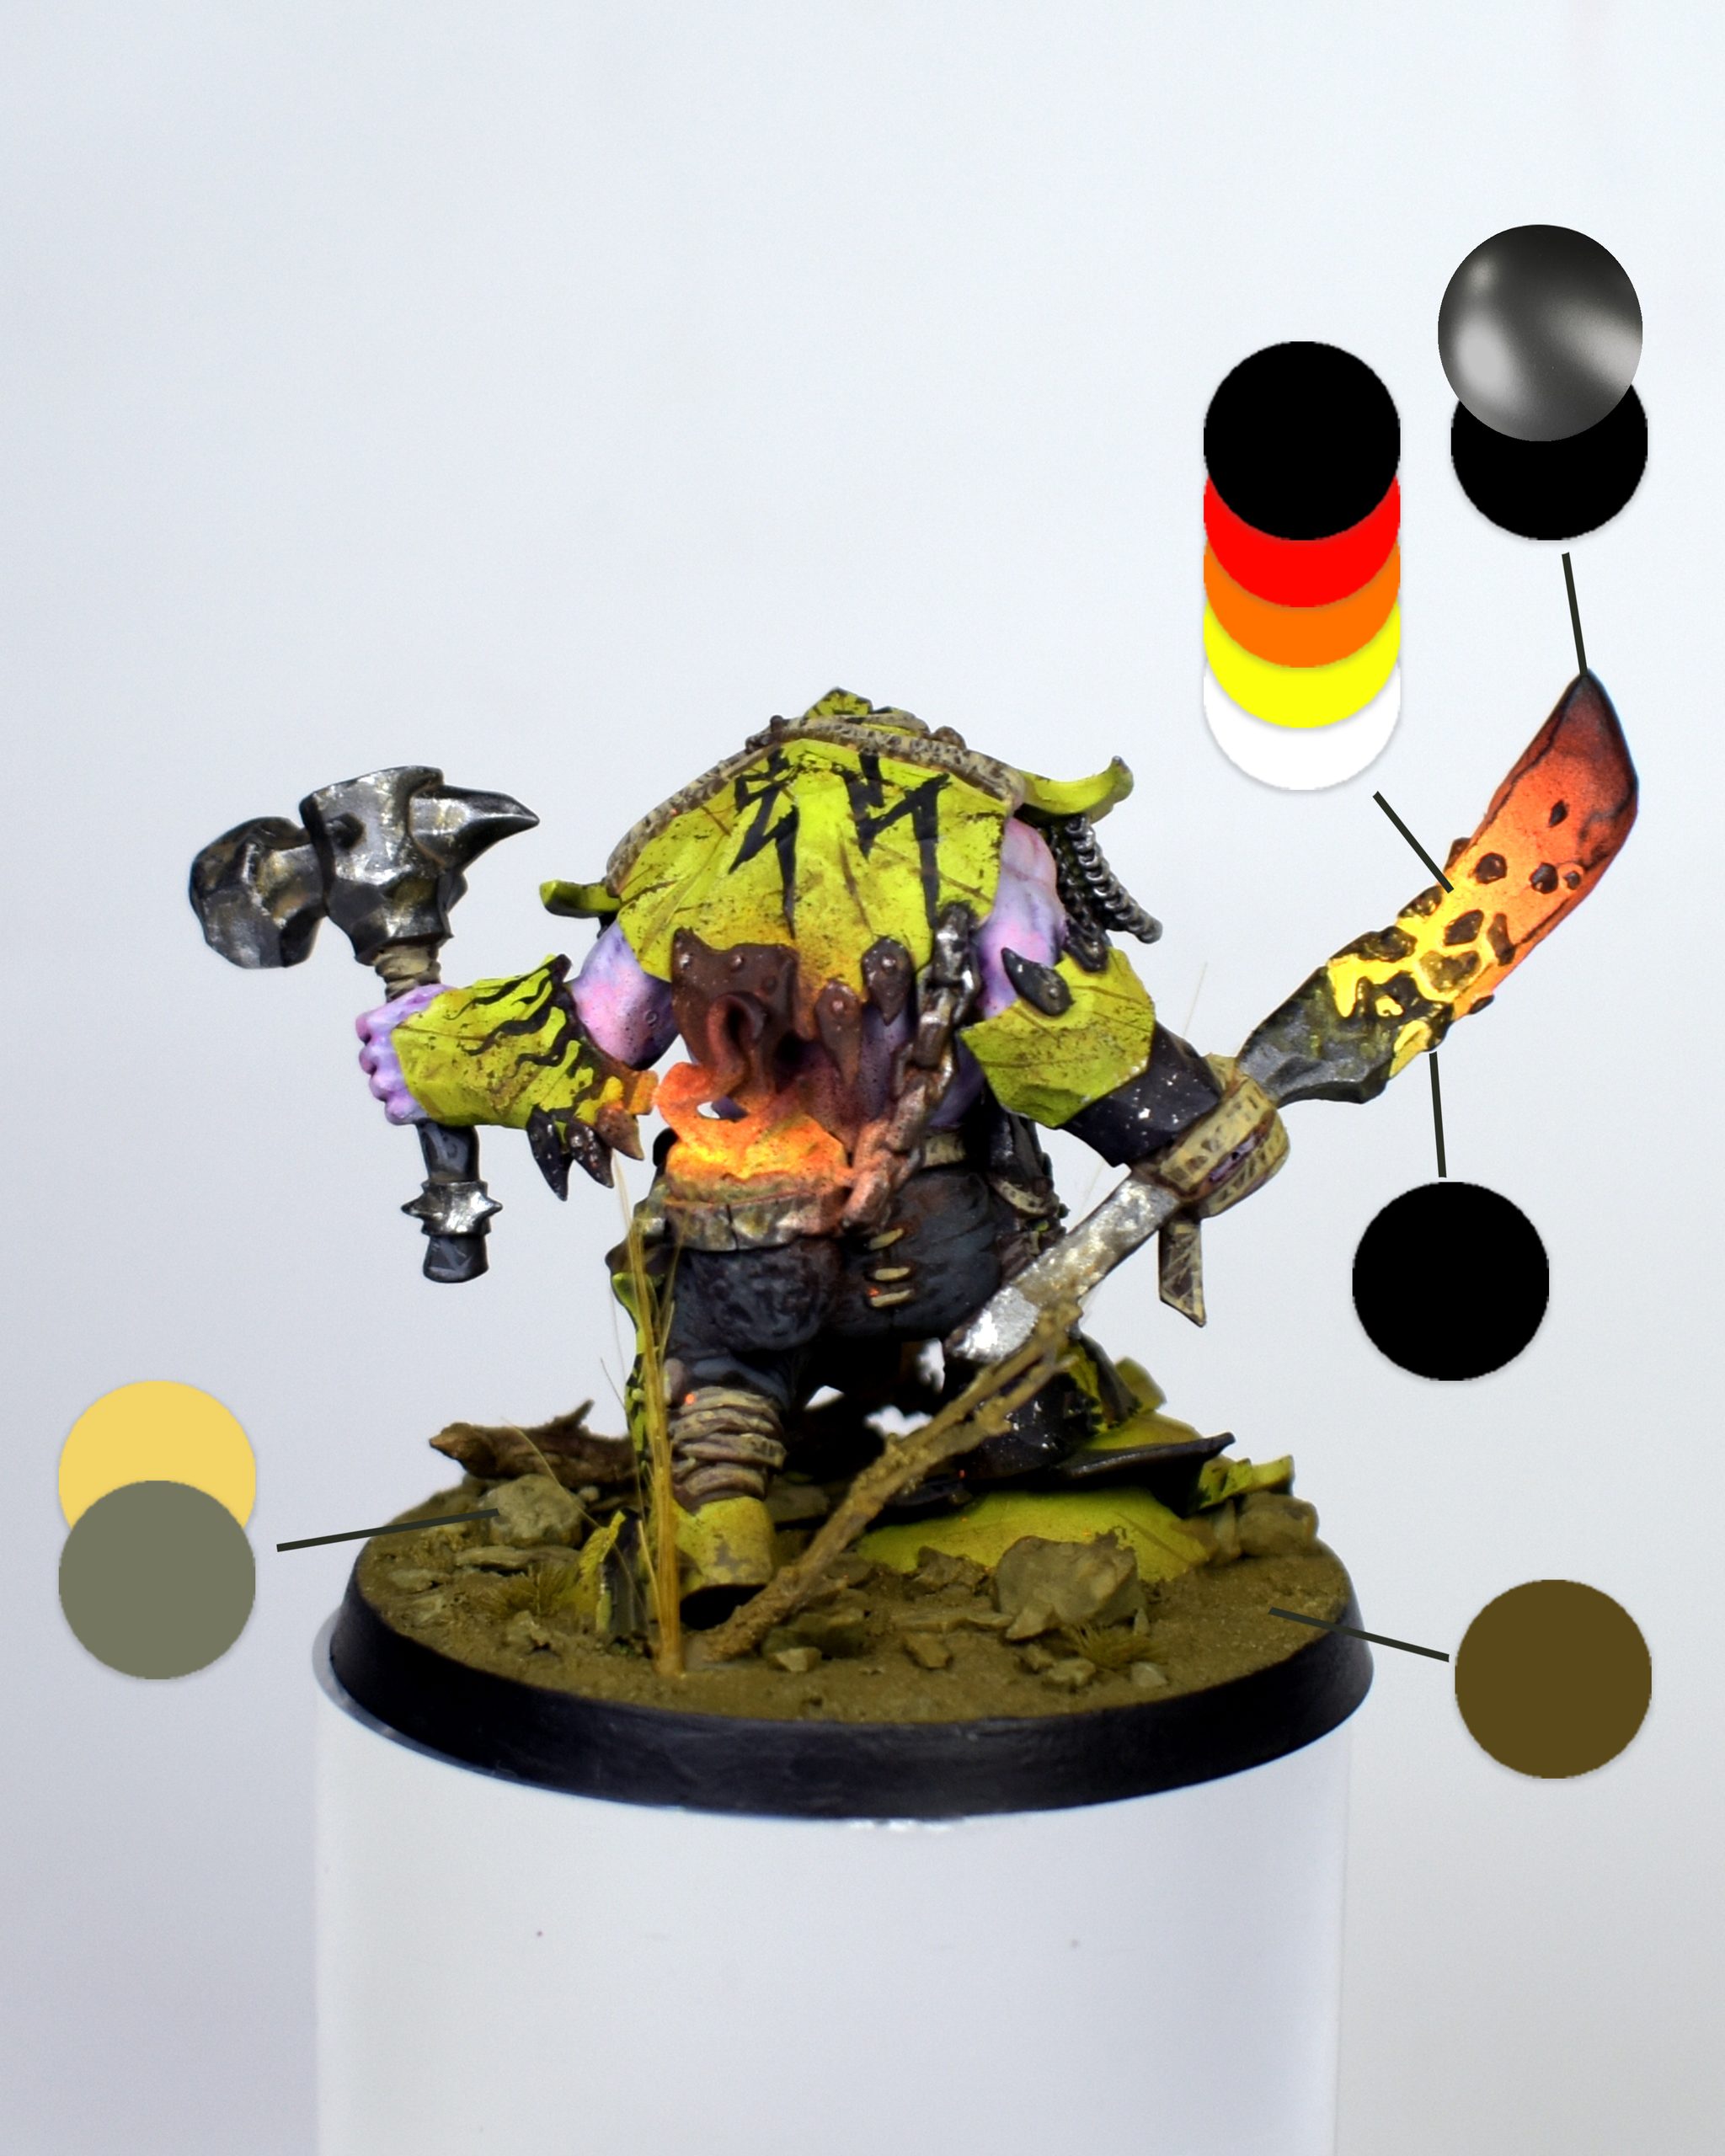
I start by airbrushing both the little cauldron on his back and the sword itself with White. Next, I’ll cover the flame and the sword with Amsterdam Reflex Yellow; after that, leaving the yellow color on the part where the flame emanates, I’ll airbrush again, this time with Amsterdam Reflex Orange. The next step (moving toward the far end of the incandescent area) is to add a little Citadel Contrast Baal Red to the remaining orange, and I finish off the very end by airbrushing it with Black only. To add the finishing touch to the sword, I make a 1:1 mixture of Black and Ionic-0173 Black Metal, and apply the dry-brushing technique along the entire length of the blade, focusing especially on the tip to create that weathered texture.
I also use slightly thinned Black to paint the scales on the blade.
As for the base, I apply a 1:1 mix of Ionic-0146 Rock Gray and Ionic-0029 Golden Flesh to highlight the rocks. I add additional pieces of branches and shrubs made from GamerGrass.
To finish it off, I airbrush the entire base and the lower areas of my figure using diluted Ionic-0147 Brown Green to blend all the elements together.
I hope you enjoyed the tutorial. Don’t miss next week’s post, we’ll have Part 2 of the tutorial, where I’ll show you how I painted Zoggrok’s squig.
If you liked this post, or if you have any suggestions for future articles, let us know in the comments!
See you next week, everyone!
ekkius.
Would you like to learn more about Age of Sigmar? Are there any topics you’d like us to cover in future articles or videos?
Let us know in the comments! You can also send us your suggestions via our Instagram.
Your feedback helps us keep creating the content you really want to see.

Descubre más desde The Generals Hub
Suscríbete y recibe las últimas entradas en tu correo electrónico.
Tags: ironjawz

The Generals Hub
Aquí encontrarás las últimas noticias de Age of Sigmar, mucho hobby, análisis del metajuego, estrategia y contenido para disfrutar al máximo del universo de los Ocho Reinos.
Leave a Reply