
Painting Guide: Pusgoyle Blightlord Fly, Step by Step

Hi! I’m jimeno, and this is my first tutorial for The Generals Hub. Since I’m new around here, I thought I’d start by telling you a little about the approach I want to take with these tutorials.
I absolutely love painting and really enjoy the whole process, but I also love actually playing with my armies. That’s why I always try to find a balance between the two: getting great-looking miniatures while using techniques and processes that I can efficiently repeat across an entire army. You’ll also notice that I often reuse the same colour recipes on different miniatures, tweaking them slightly whenever needed. Besides saving time, this also helps keep the whole army visually consistent. At the end of the day, the goal is to make the most of the time I spend painting without giving up on putting an army on the table that I’m genuinely proud of.
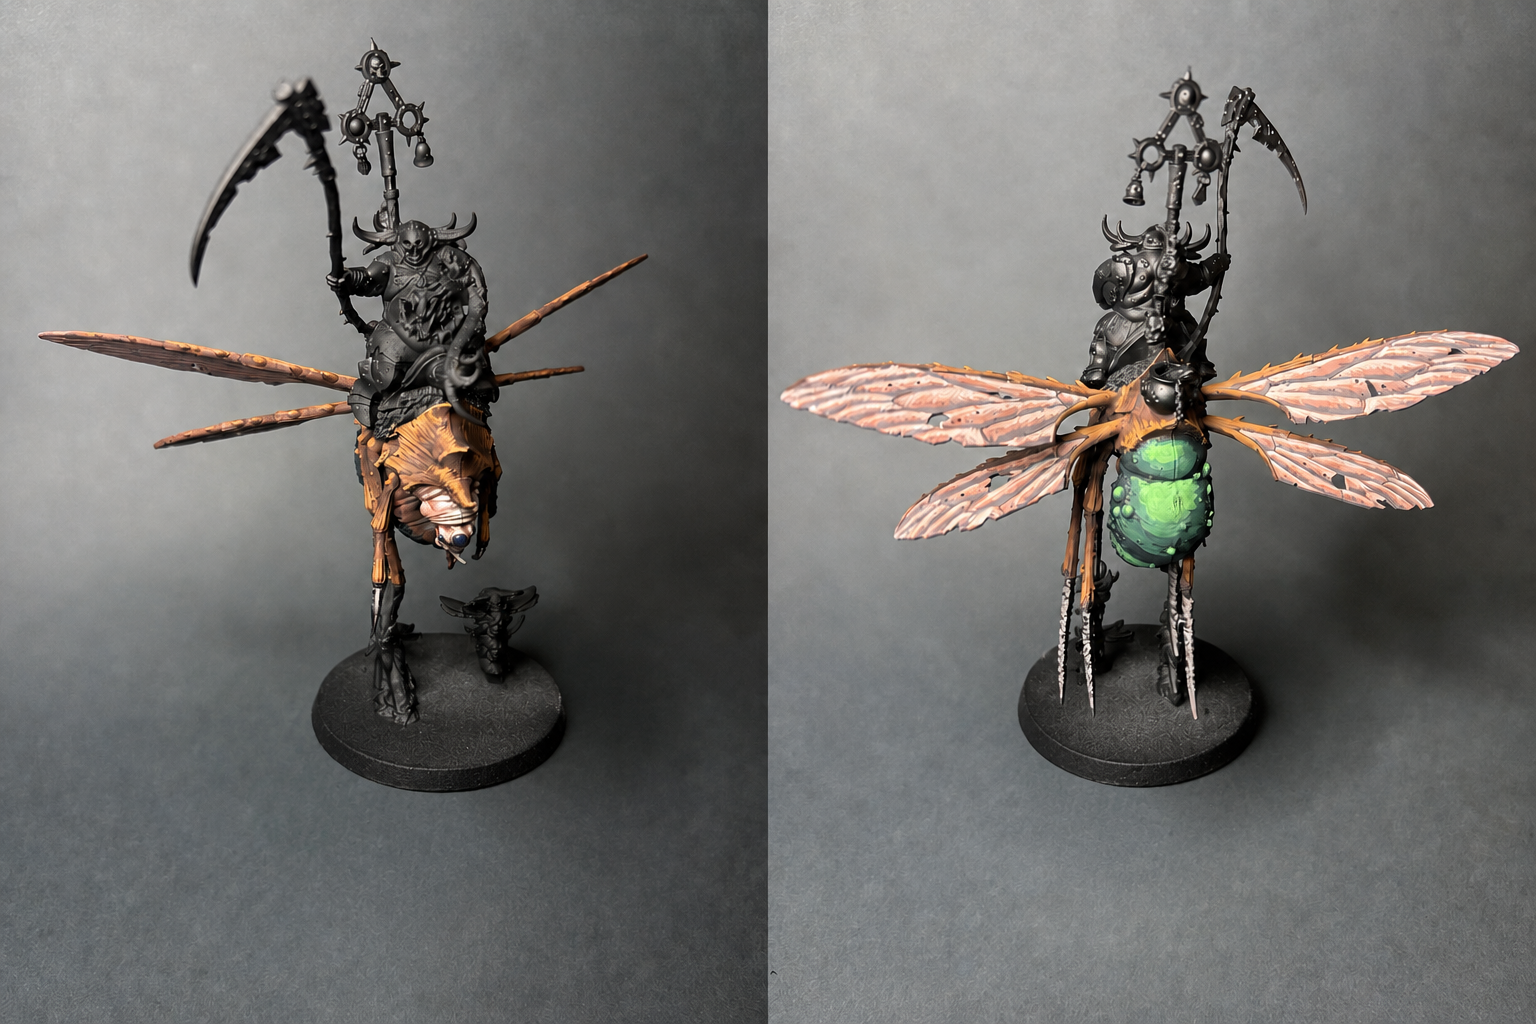
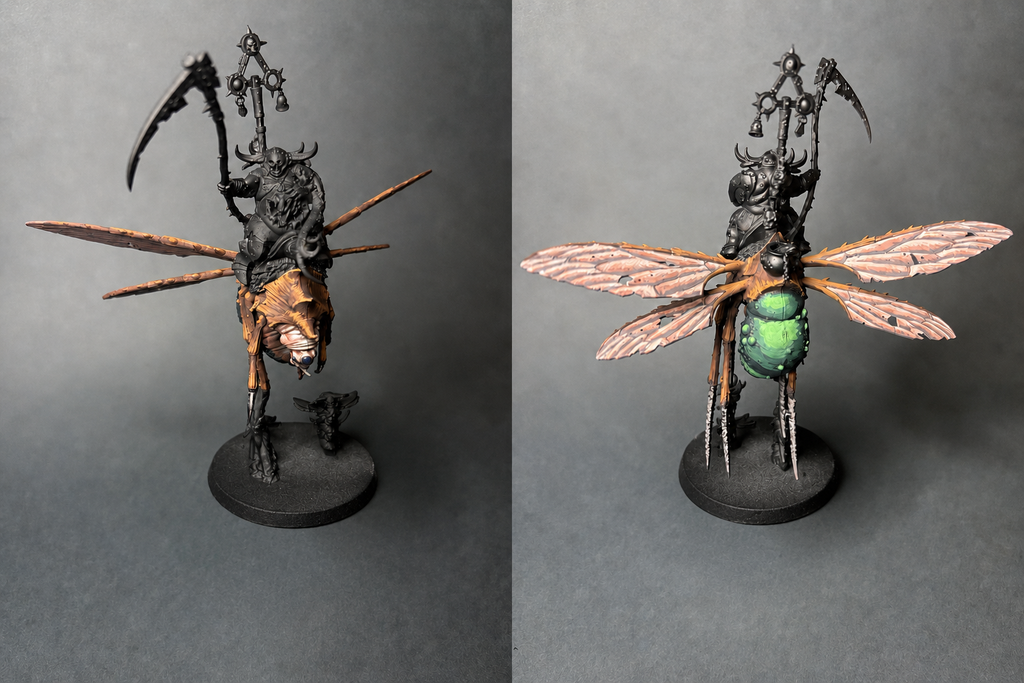
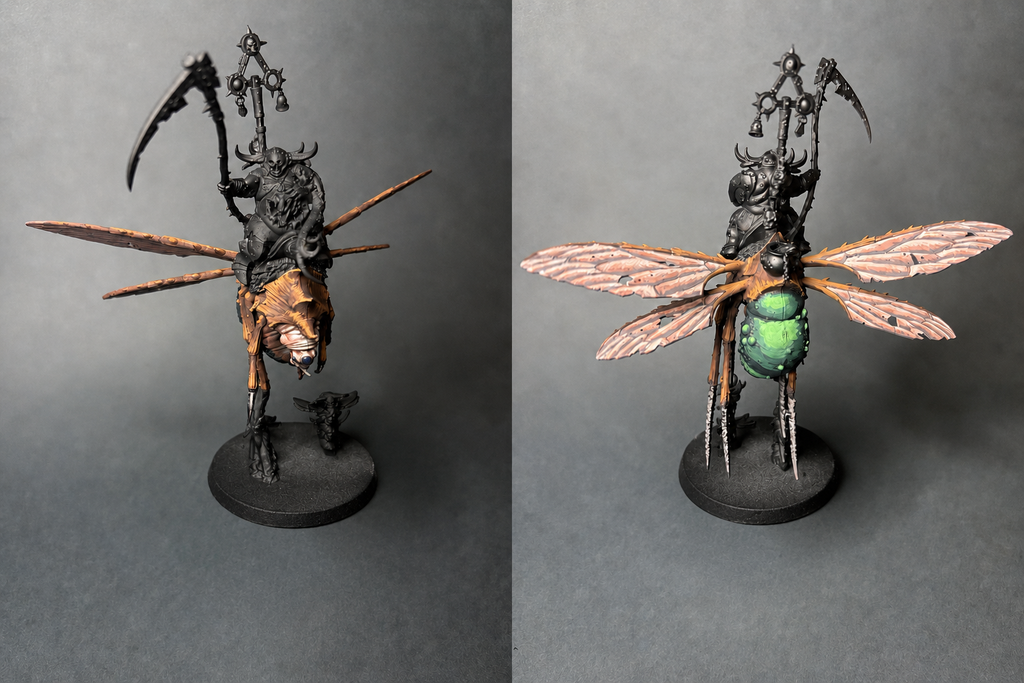
And for my first tutorial, we’re starting with something particularly beautiful —at least in Grandfather Nurgle’s eyes—. In this The Generals Hub and Jimeno Minis tutorial, we’ll focus exclusively on painting the fly from a Pusgoyle Blightlord, leaving the rider for part two.
We’ll paint the chest and head in dead-flesh tones, give the upper body a more fly-like green colour, and then tackle the wings, carapace and eye. The miniature is already fully assembled, so we can get straight into it.
Before we start
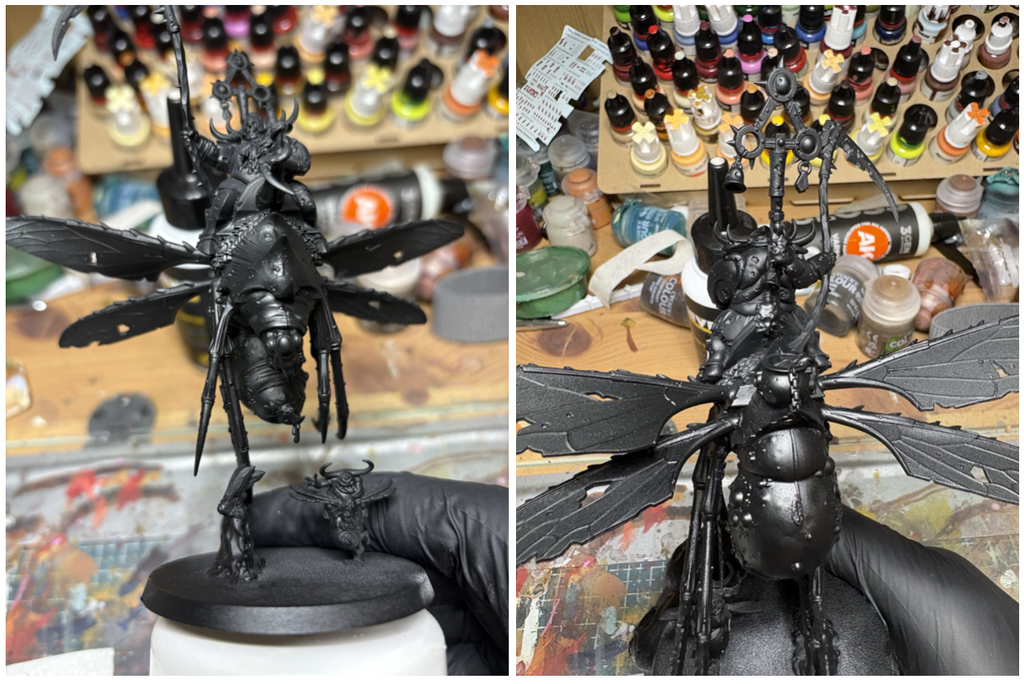
Before I start painting, there’s one thing I do pretty much every time: take a few photos of the miniature after priming it black.
It might sound like a small thing, but these photos are incredibly useful as a reference throughout the painting process. With the miniature still completely black, it’s much easier to see how the light hits the different volumes and, more importantly, where our highlights should eventually go.
The idea isn’t to follow those photos to the millimetre, but to have a quick reference so we’re not just placing highlights randomly and ending up lighting areas that don’t make much sense. It literally takes a moment and can be really helpful, especially on miniatures with as many different shapes and volumes as this fly.
Fly head and body
For the body and head, we’ll use the photos we took of the miniature with the black primer as our reference. They give us a pretty clear idea of where the light hits, so we can use those areas as a guide while building up the volumes.
The idea throughout the whole process is very simple: with every step, we cover slightly less area than before, gradually concentrating the colour on the areas where we want the highlights to be.
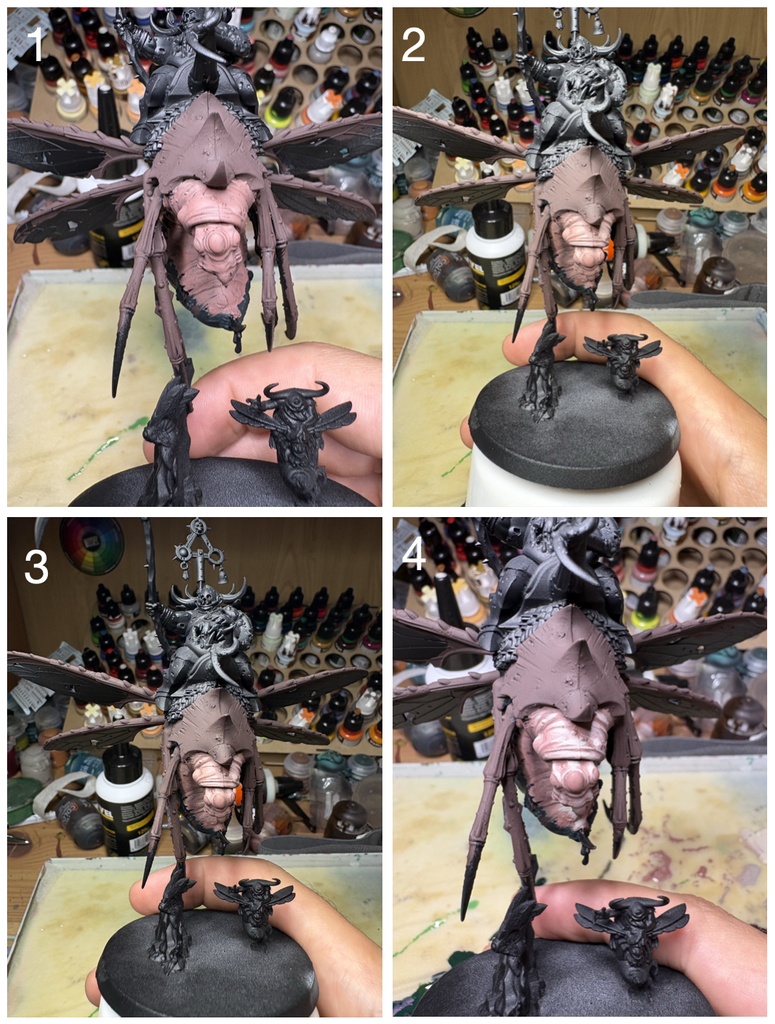
- Base: Bugman’s Glow – Citadel
- First highlight: 1 part Bugman’s Glow – Citadel + 2 parts Rakarth Flesh – Citadel
- Second highlight: Rakarth Flesh – Citadel
- Third highlight: 50% Rakarth Flesh – Citadel + 50% Bonewhite – Vallejo
Apply it only to the most exposed areas. At this stage, we’re looking for specific points of maximum light, such as the head and the central part of the neck.
Eye
For the eye, we’re going to use a very simple recipe, similar to the classic way of painting gemstones. The idea is to create contrast by keeping the upper part darker and concentrating the highlights in a crescent shape along the bottom, extending slightly up the right-hand side.
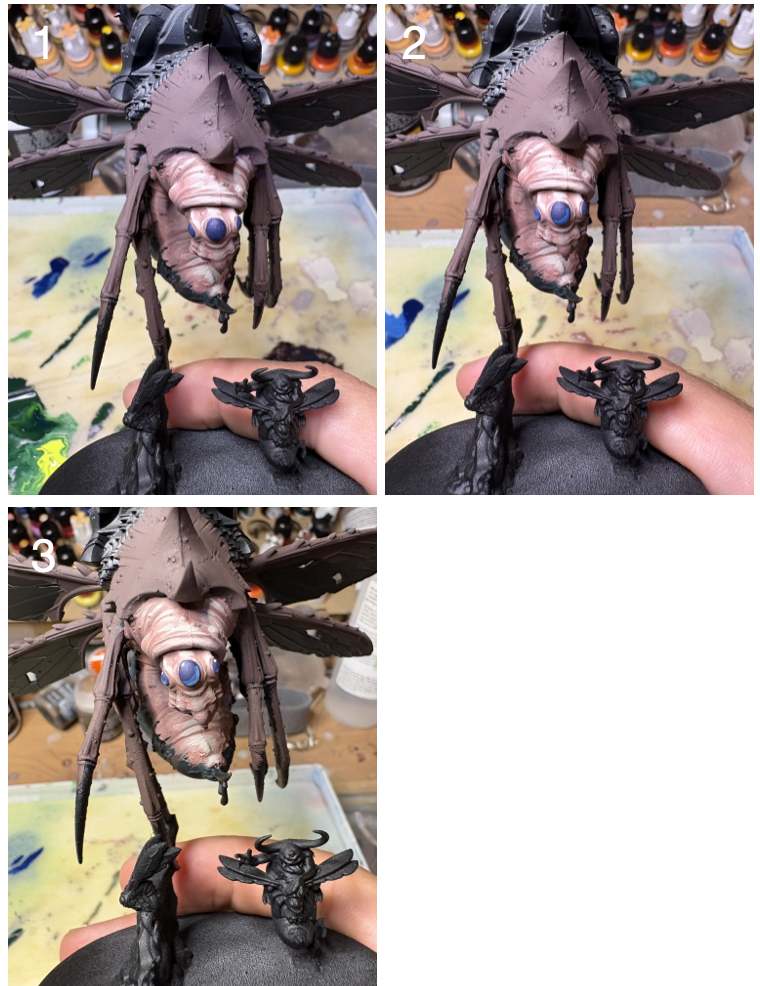
- Black Blue – Vallejo. Paint the whole eye.
- Black Blue – Vallejo + White – Vallejo. Paint a crescent along the bottom, extending slightly up the right-hand side.
- Previous mix + more White. Repeat the crescent, covering a smaller area.
- White. Add a small dot in the top-left corner.
Back
For the back, we start with a dark mix of Black Blue and Dark Green, both from Vallejo. From there, we’ll gradually add Bile Green to build up the highlights.
In the final photo, you can see the three highlight stages together. As with the previous areas, we use the light from our black-primer photos as a reference, covering a smaller area with each layer.
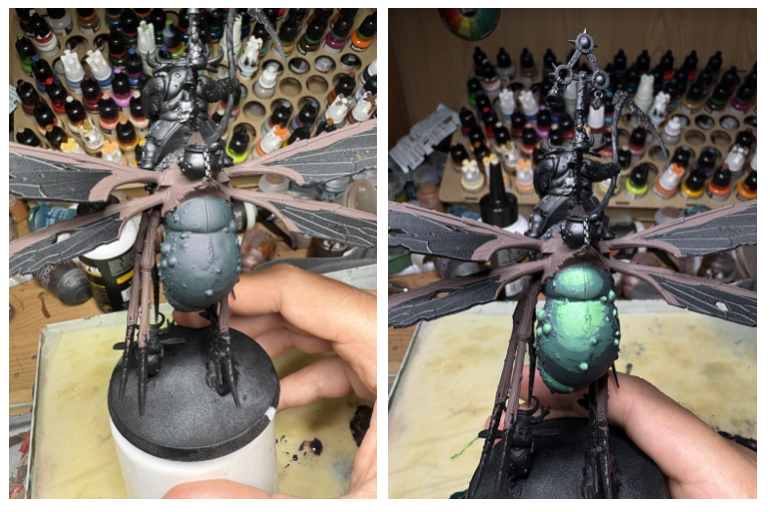
- Black Blue – Vallejo + Dark Green – Vallejo.
- Paint the entire back with the base mix. Base mix + Bile Green – Vallejo. Apply three highlights, covering less area each time and following the volumes.
Carapace and legs
For the carapace and legs, we’ll start with reddish-brown tones and gradually push them towards a warmer colour using Parasite Brown.
Instead of applying smooth, uniform highlights to the carapace, we’ll paint thin lines running from the inside towards the edges, always following the highlighted areas we identified in the black-primer photos. With each step, we’ll reduce the area and make those lines more defined.
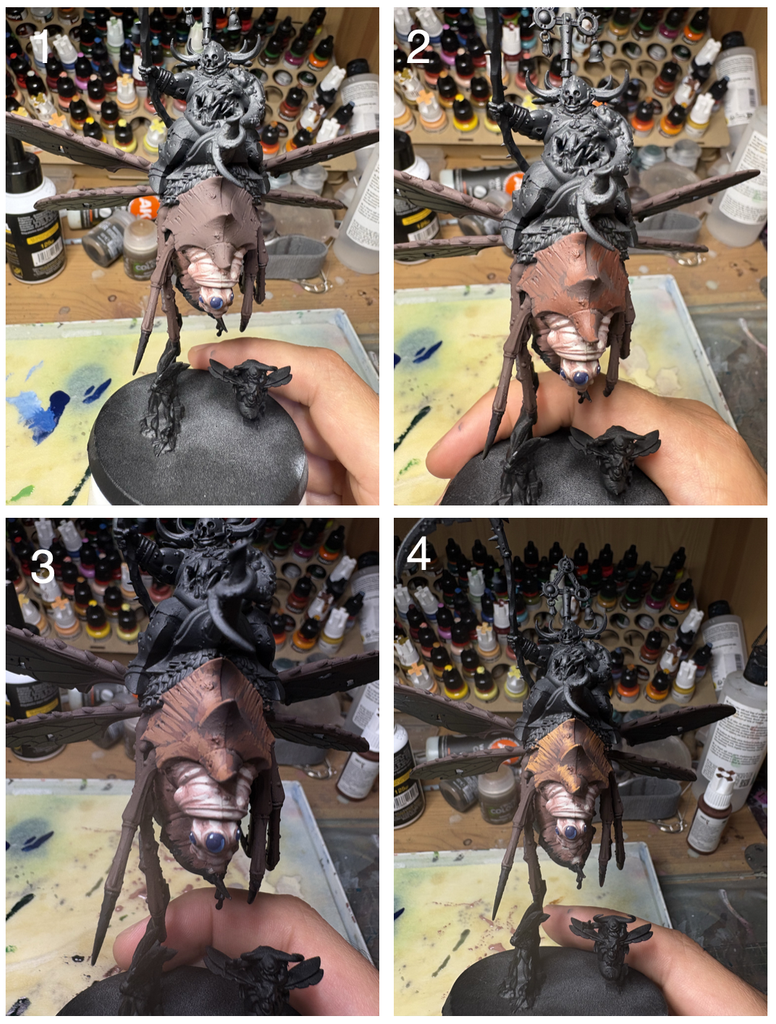
- Hull Red – AK + Charred Brown – Vallejo + a little Tenebrous Grey – AK
- Apply the base colour across the whole carapace and legs. Hull Red – AK
- Cover almost the entire surface, leaving only the deepest shadows. Hull Red – AK + Parasite Brown – Vallejo
- Start building the highlights with lines running towards the edges of the carapace. Hull Red – AK + more Parasite Brown – Vallejo
- Repeat the lines over a smaller area, concentrating them on the brightest parts. Parasite Brown – Vallejo
- Apply it to the edges and areas of maximum light.
Wings
For the wings, we’ll work with progressively smaller layers, leaving the darker areas visible between them so the structure of the wing remains clearly defined.
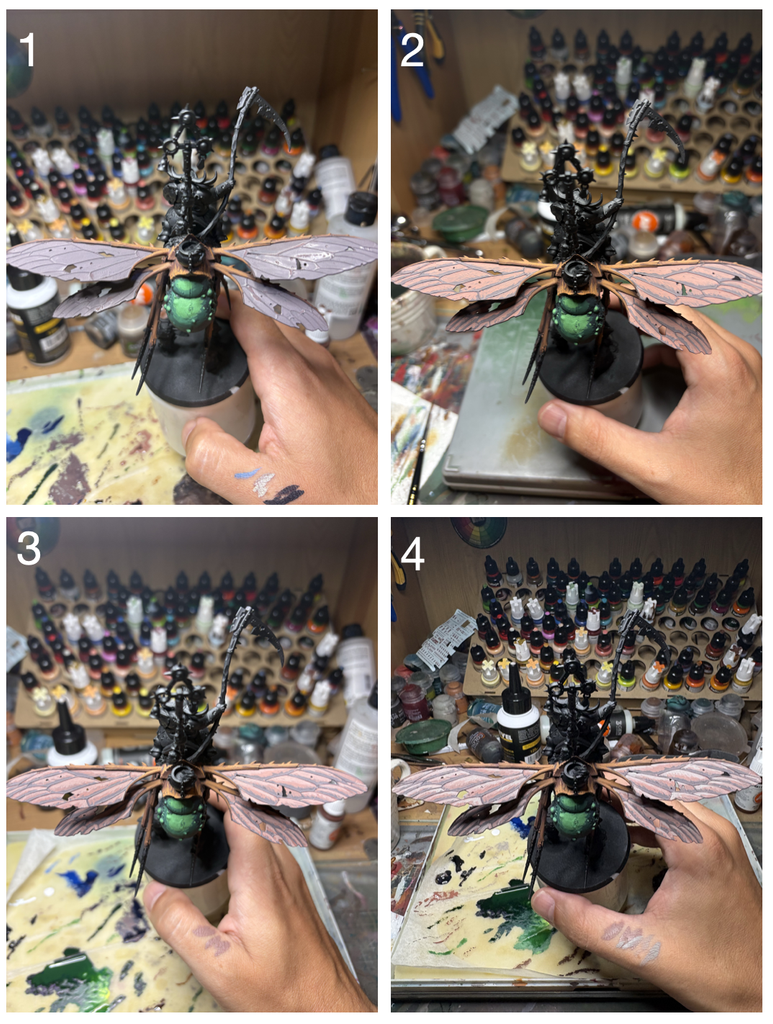
-
50% Black Blue – Vallejo + 50% Bugman’s Glow – Citadel
Cover the entire wing with the base colour. -
Bugman’s Glow – Citadel
Cover approximately 80% of the surface. -
1 part Bugman’s Glow – Citadel + 2 parts Rakarth Flesh – Citadel
Reduce the area and cover approximately 50%. -
Rakarth Flesh – Citadel
Apply the final highlight over roughly 25% of the surface, concentrating on the most exposed areas.
Final result
As I said at the beginning, you don’t have to choose between playing with a sea of grey plastic or disappearing from the real world for six months just to paint an entire army. Your friends and family will thank you!
So follow along with the next posts and I’ll show you how to get great-looking, coherent armies ready for the tabletop without sinking endless hours into them.
Next time, we’ll finish the Pusgoyle Blightlord by painting the rider. And if you have any questions, want to see any of the steps in more detail, or simply want to show me how yours turned out, leave a comment or come say hi over at @jimeno.minis.
Want to learn more about Age of Sigmar? Is there anything you’d like us to cover in future articles or videos?
Let us know in the comments! You can also send us your suggestions over on our Instagram.
Your feedback helps us keep creating the content you actually want to see.

Descubre más desde The Generals Hub
Suscríbete y recibe las últimas entradas en tu correo electrónico.
Tags: maggotkin of nurgle

The Generals Hub
Aquí encontrarás las últimas noticias de Age of Sigmar, mucho hobby, análisis del metajuego, estrategia y contenido para disfrutar al máximo del universo de los Ocho Reinos.
Leave a Reply