
Painting Guide: Lord of Hysteria, Step by Step

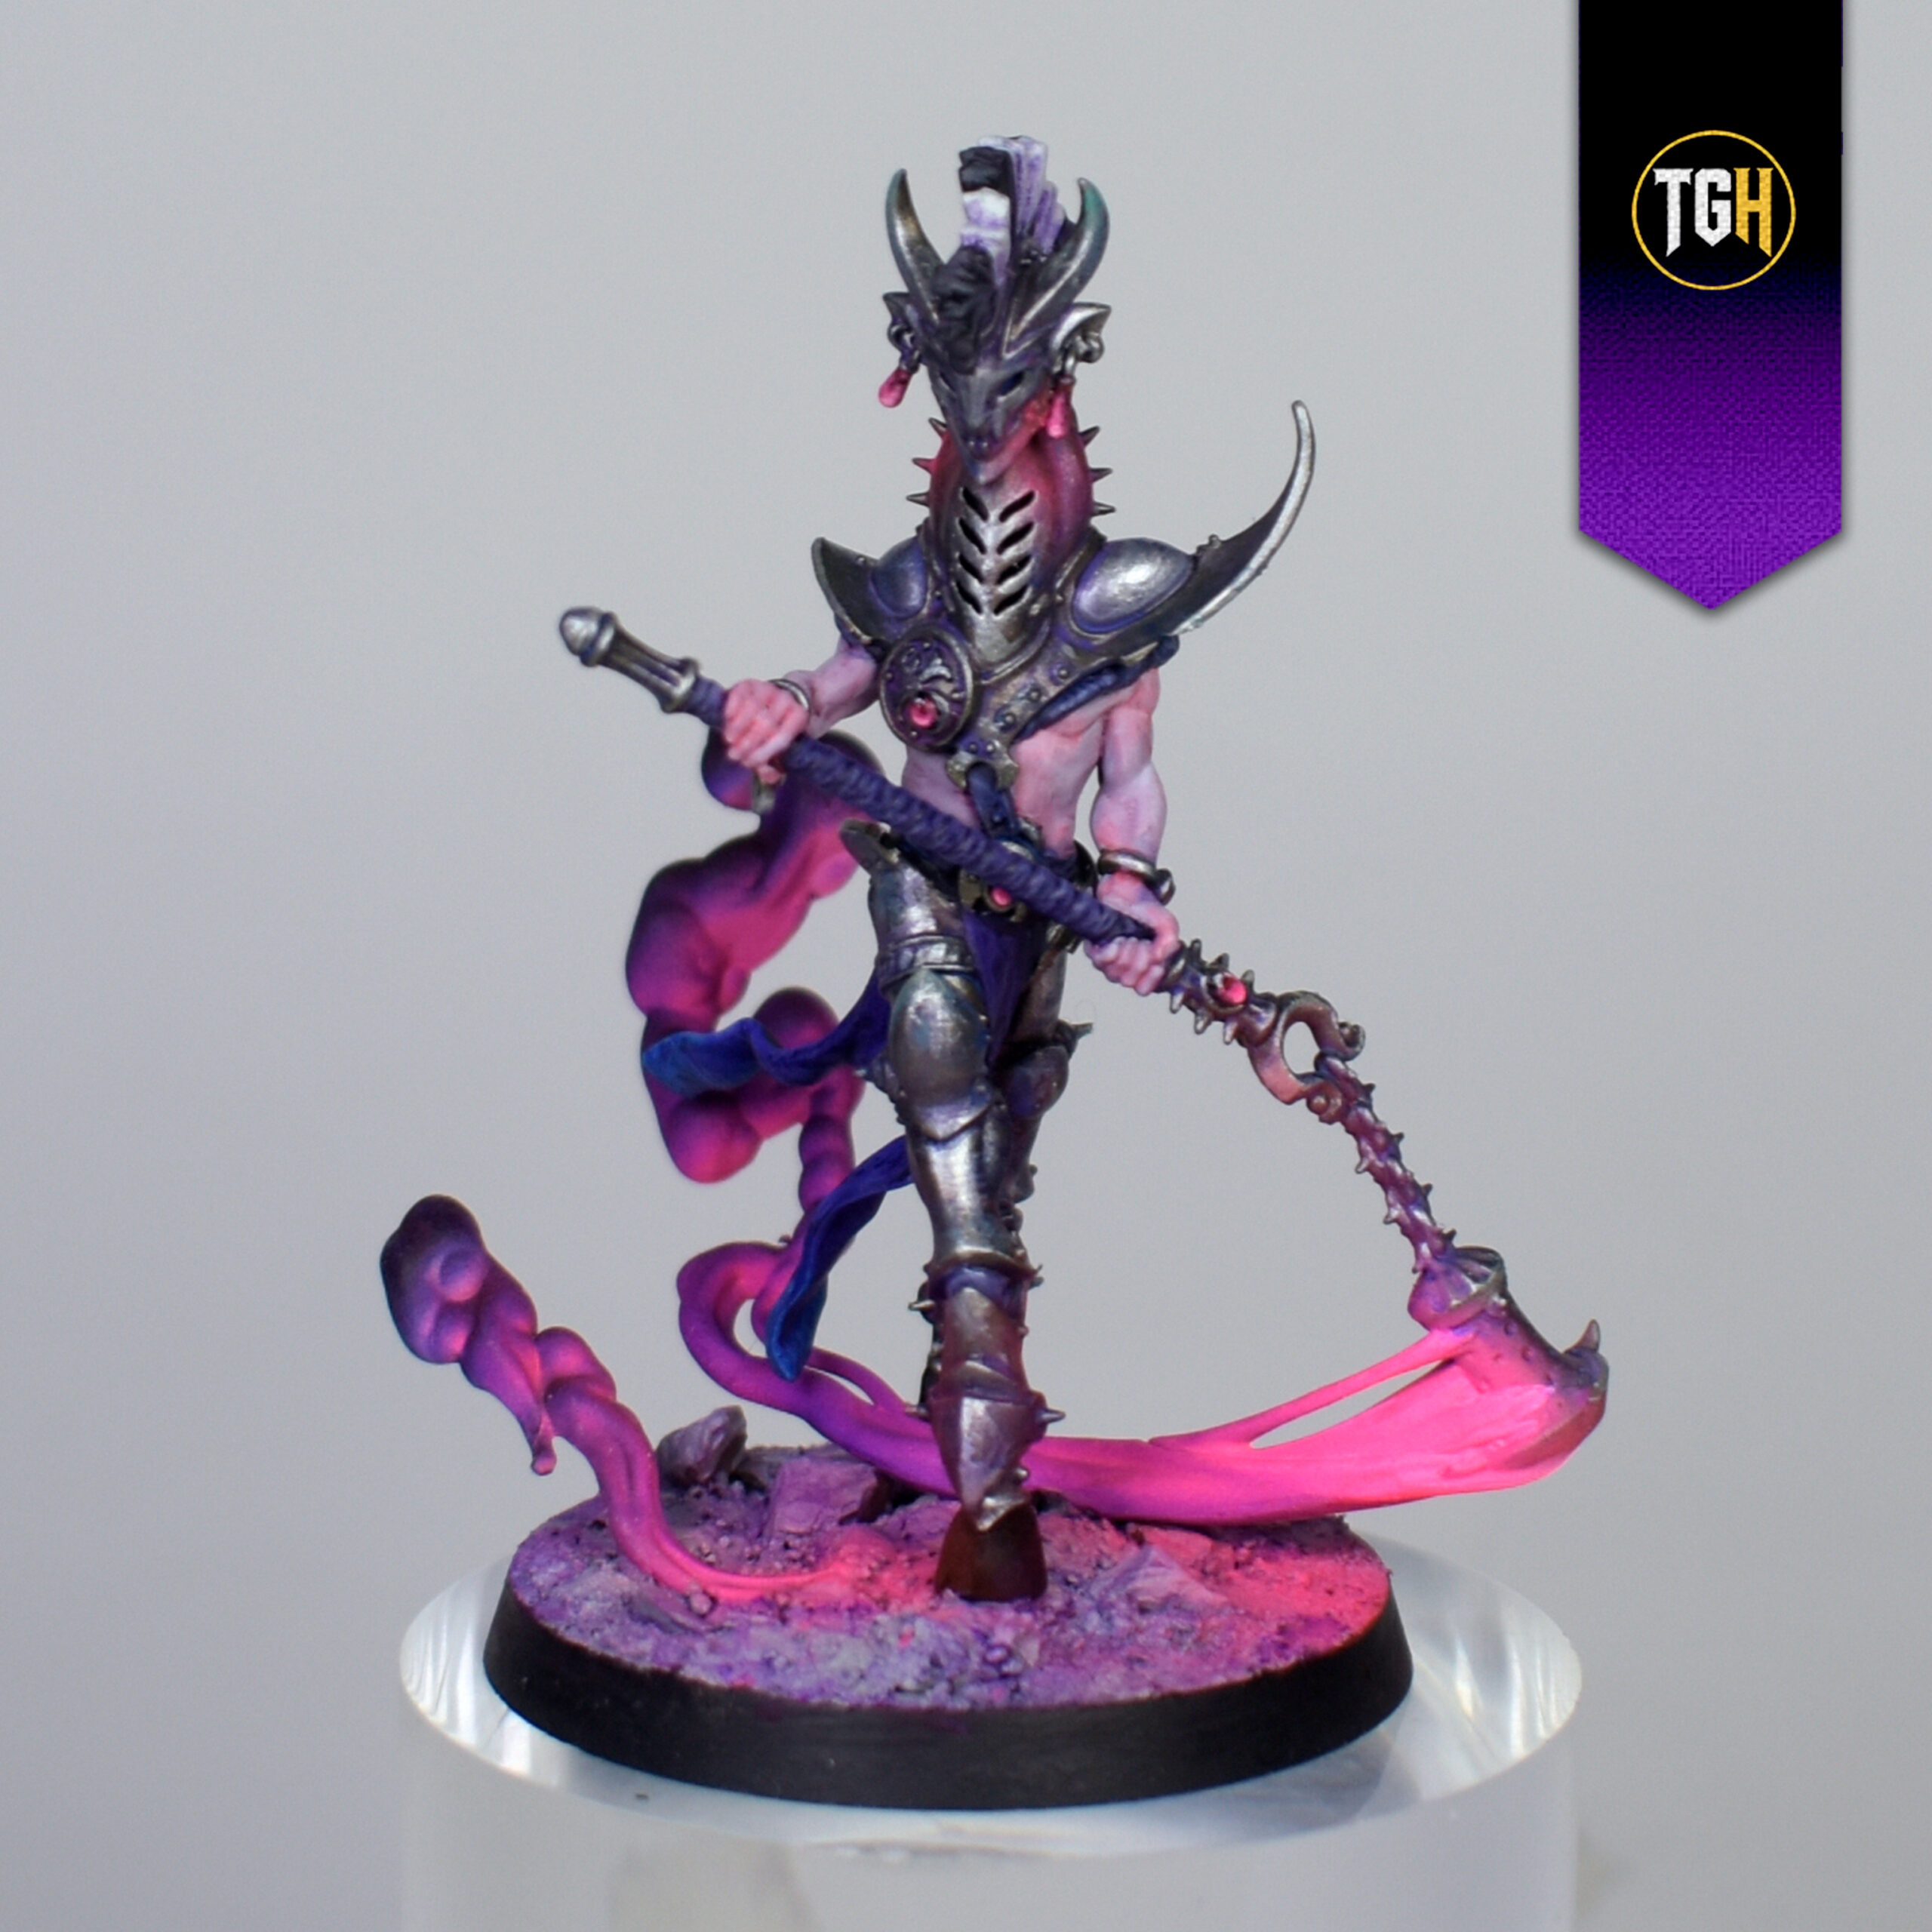
Hello, Generals, and welcome once again to The Generals Hub’s painting tutorials. This time, I’m bringing you a step-by-step painting guide for the Lord of Hysteria, one of the new miniatures from the Hedonites of Slaanesh army. Not long ago, I decided to start collecting this army, and I’ve been thinking for a while about how to paint it.
I’m drawn to creating a color scheme with cool tones and a nocturnal atmosphere, so I think that will be the predominant theme for this miniature (and for my army).
Let’s get started!
Priming
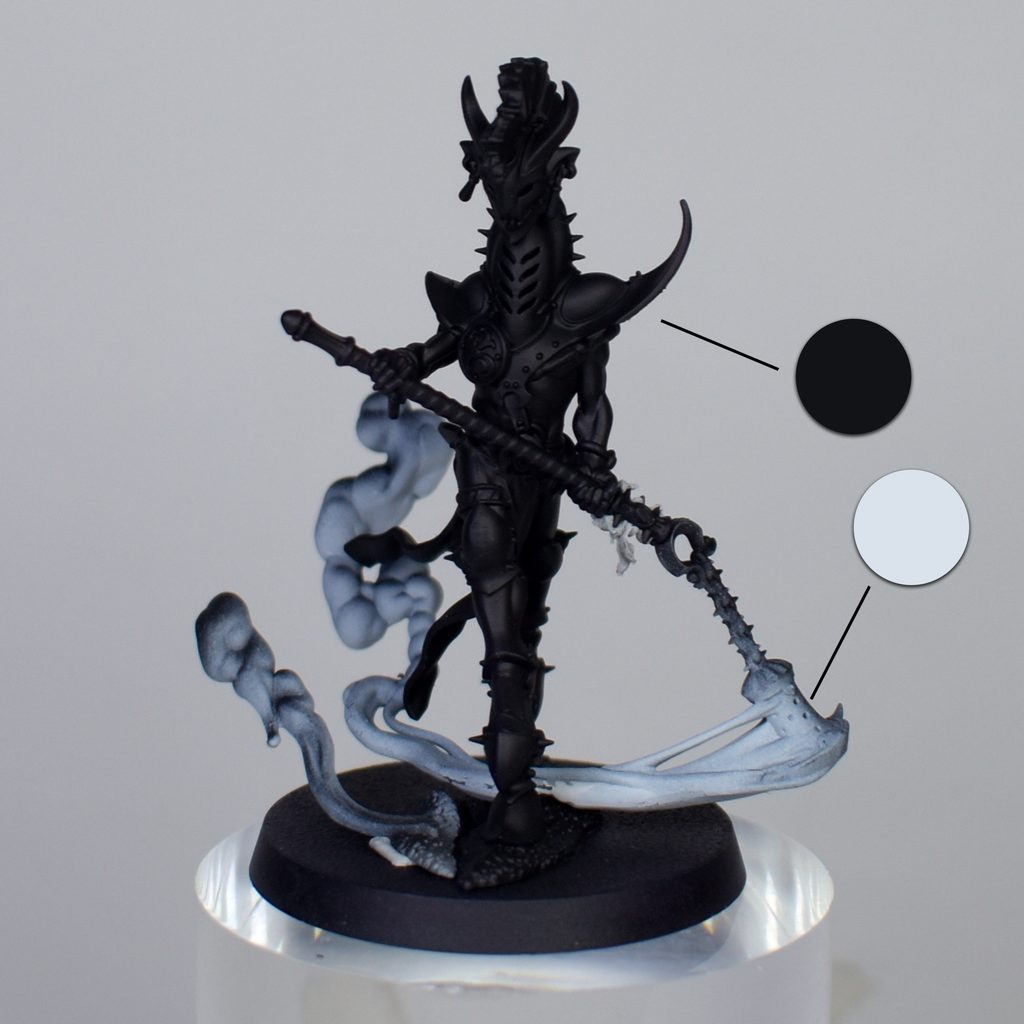
For the primer, since most parts of the figure contain armor, I choose to prime it in black using the Ionic-0340 Black primer. I take advantage of the smoke from the figure’s censer and apply Ionic-0341 White with an airbrush to achieve some initial depth. I haven’t worked on the base yet, but I’ll add it later in the tutorial.
Base
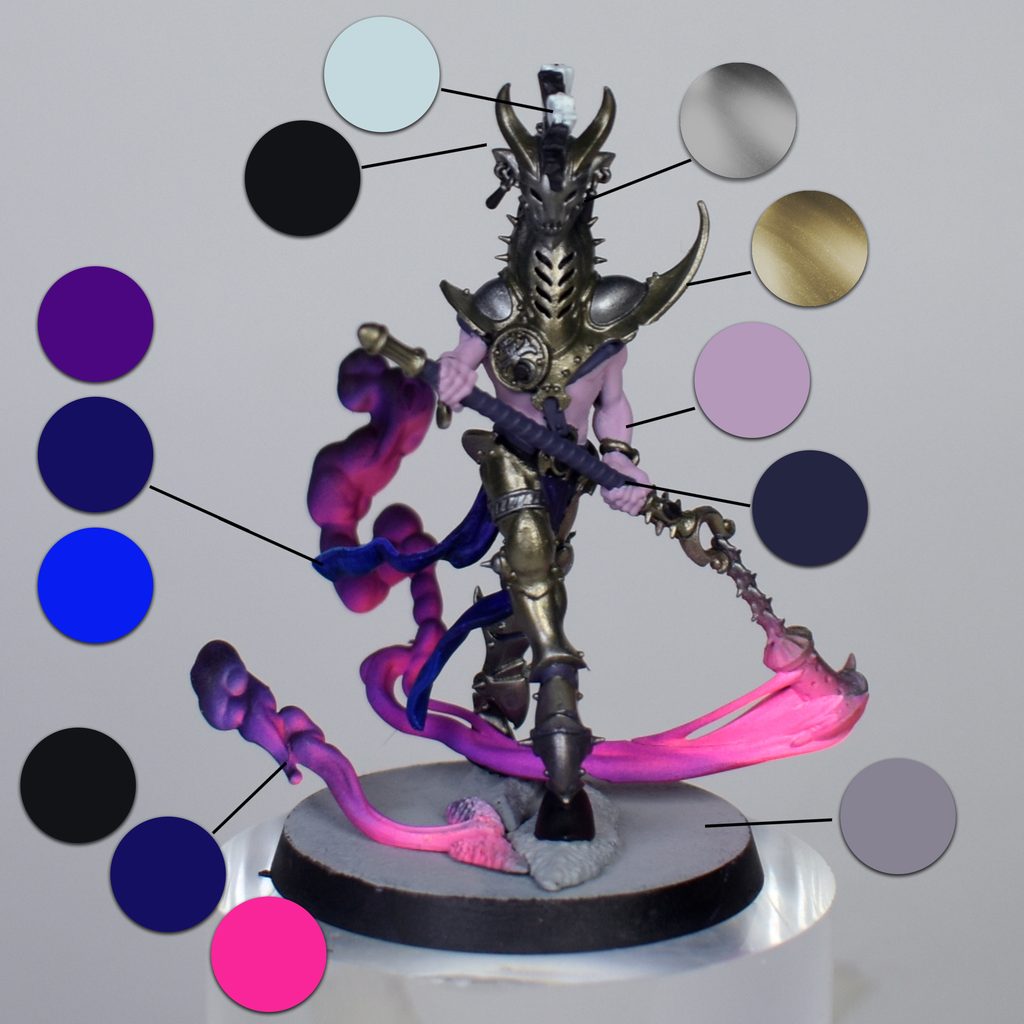
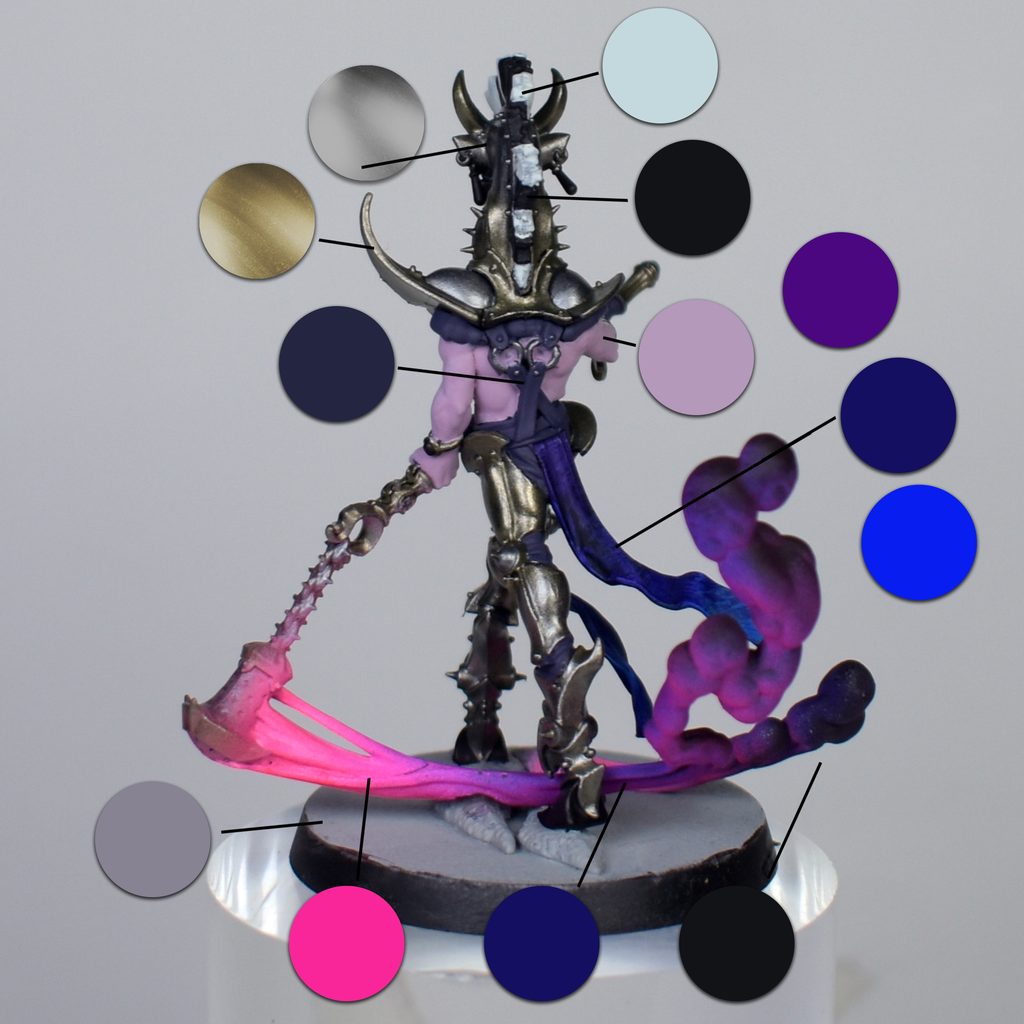
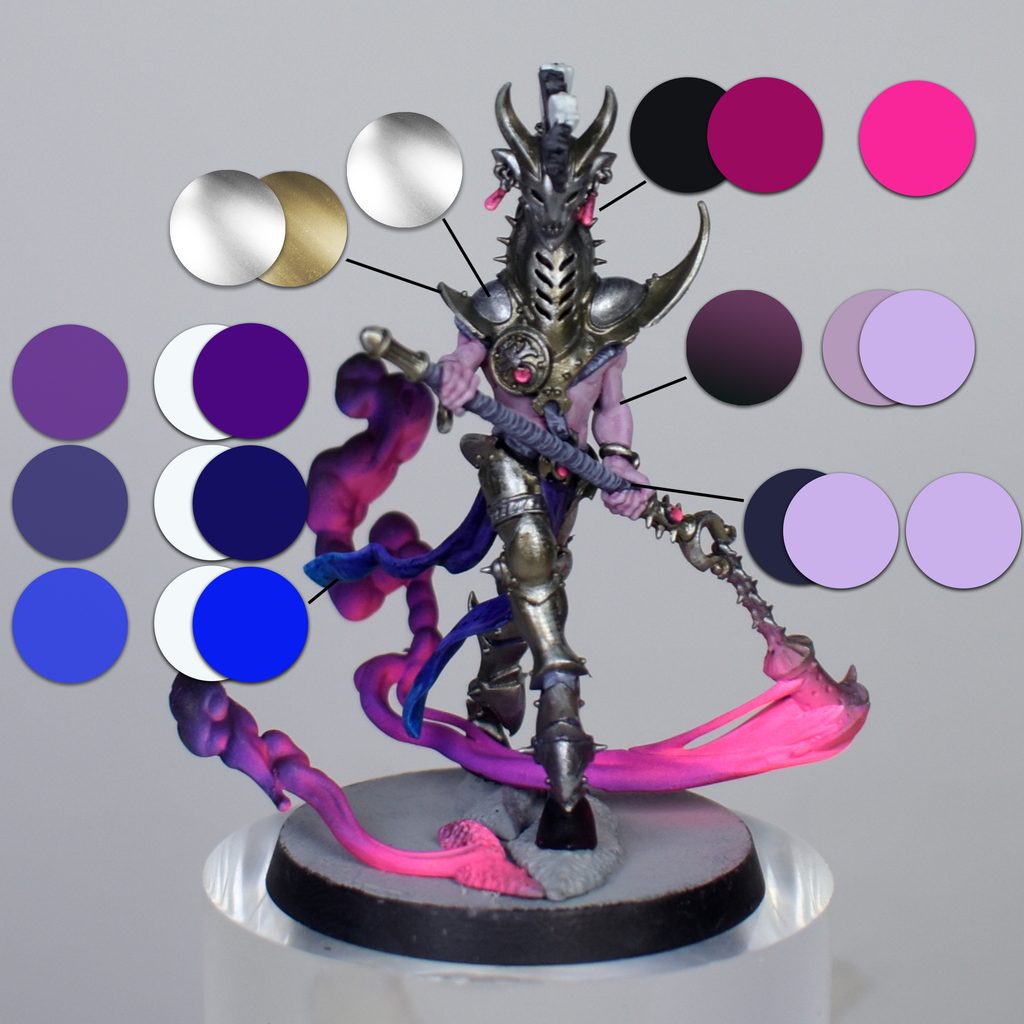
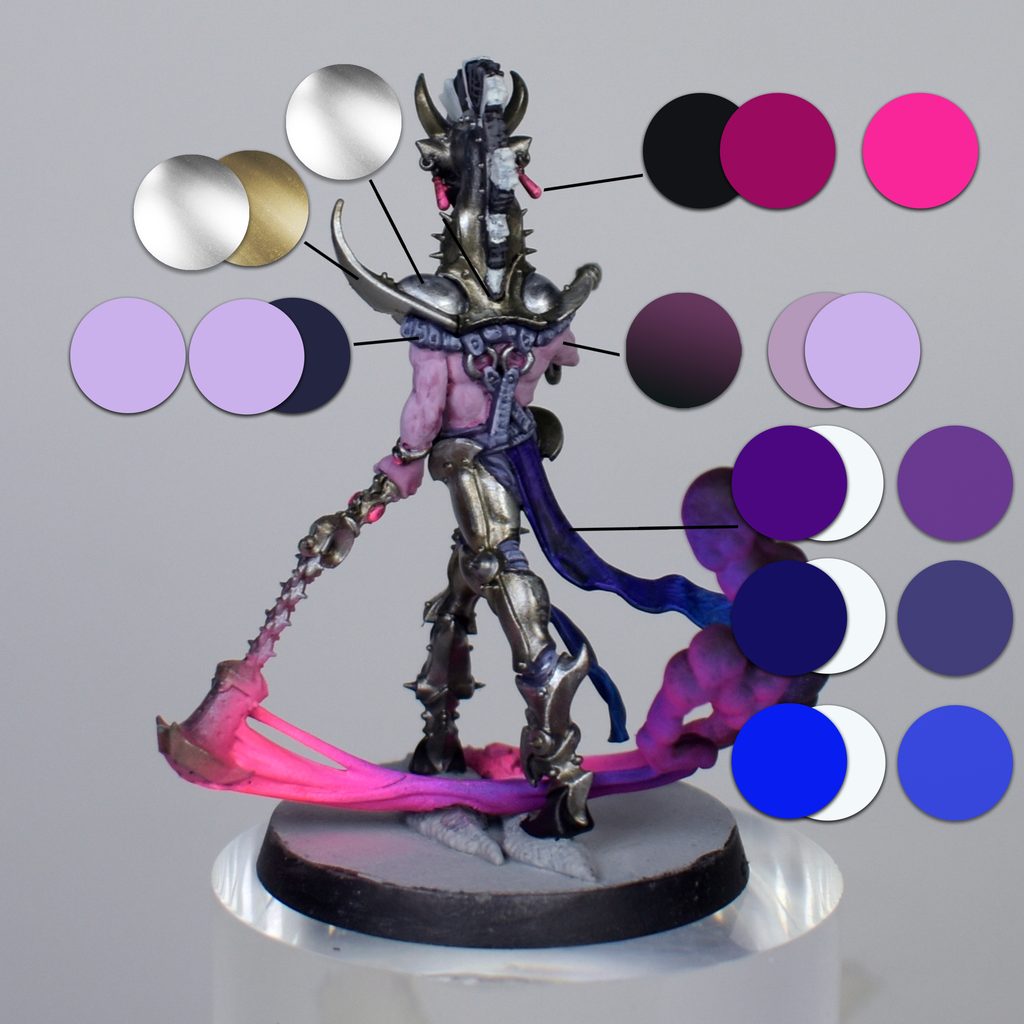
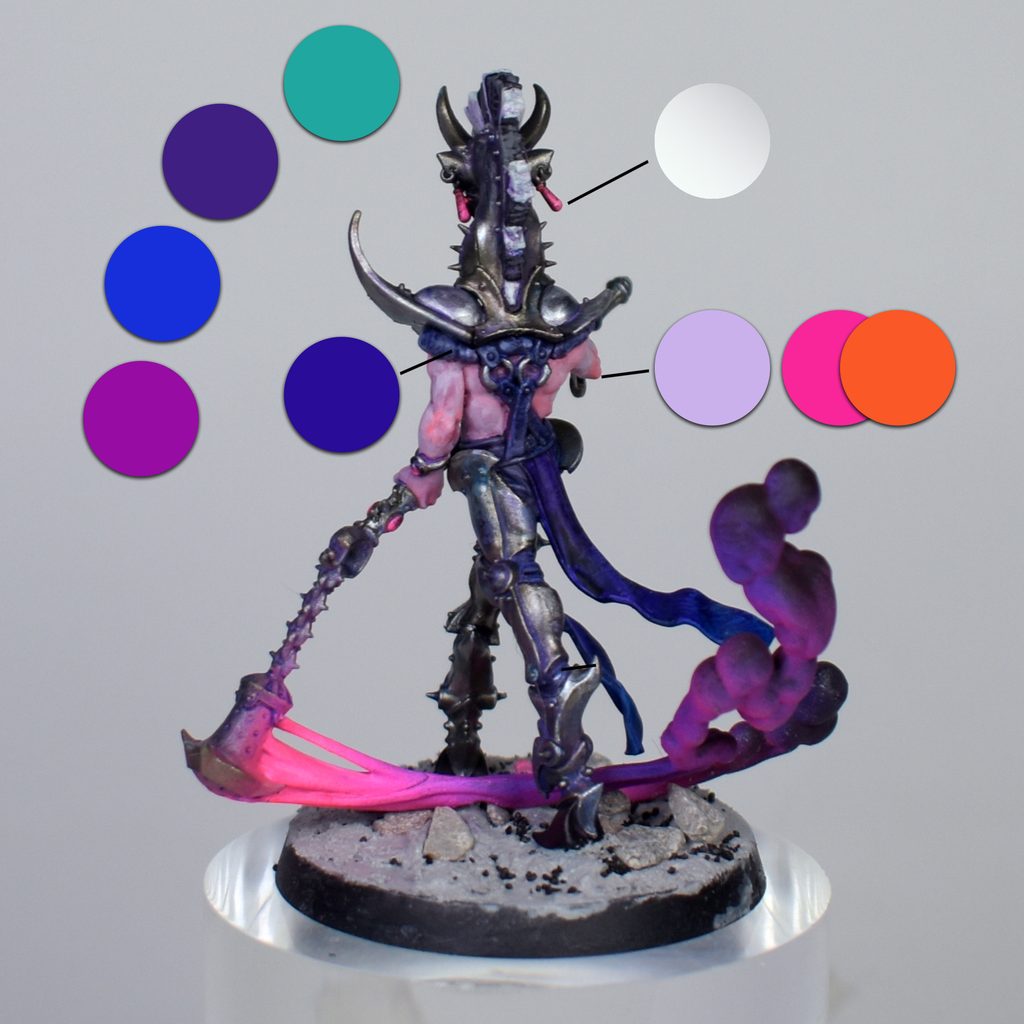
I start by applying paints from Ionic’s Heavy Metal line to the metal parts, specifically Ionic-0819 Burnished Metal (base) and Ionic-0818 Tarnished Metal (base), using the latter as a light “gold,” which will be perfect for the cooler look I’m going for with this figure.
I painted the leather parts with Ionic-0086 Oxford Blue. For the skin, I used Ionic-0060 Thanatos Grey. I decorated the crest by alternating between Ionic-0172 Black and Ionic-0006 Zombie Grey.
For the fabrics, I applied a wet blend using the following colors: Ionic-0079 Purple at the top, followed by Ionic-0076 Deep Violet, and finally, at the end, I used Ionic-0096 Phthalo Blue.
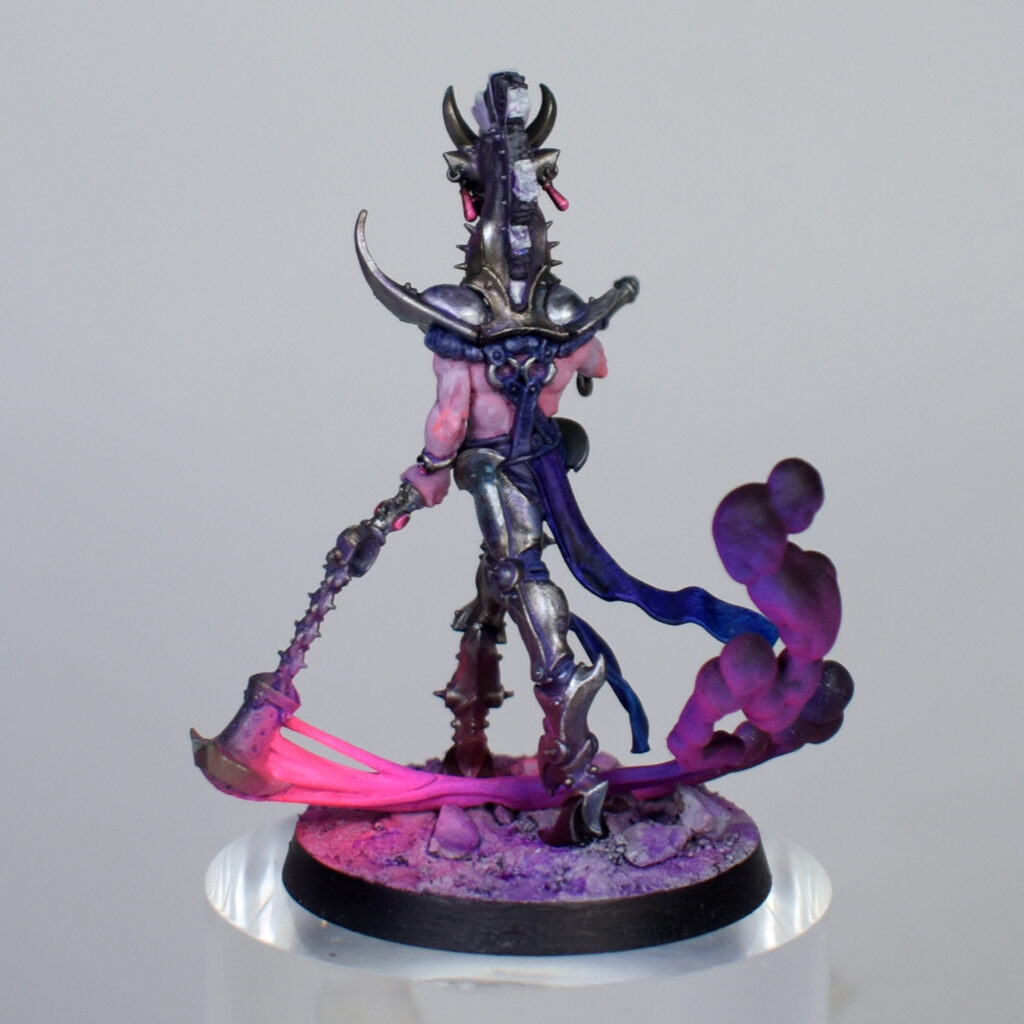
For the smoke from the censer, I airbrushed a layer of Amsterdam’s Reflex Rose fluorescent paint on the part closest to the object. As we move away, I applied a mixture of this color and Ionic-0076 Deep Violet in a 1:1 ratio. To finish, I used Ionic-0172 Black to add a final touch of darkness to the smoke, applied with the airbrush only from the top of the smoke.
The base was painted a temporary color, Ionic-0164 Moon Grey.
Highlights
For the leather and straps, I first used a 1:1 mixture of Ionic-0086 Oxford Blue and Ionic-0082 Light Lavender to apply a base coat, which I will then go over again, this time using only Ionic-0082 Light Lavender.
On the leather, I applied a wash of Citadel Carroburgh Crimson diluted with water, making sure it was applied mainly to the areas where the material changed (leather near straps, bracelets, etc.). After letting it dry, I applied a new highlight using a 1:1 mixture of the base color Ionic-0060 Thanatos Grey and Ionic-0082 Light Lavender, taking care not to cover all of the previous work.
For the metal highlights, I used Ionic-0859 Burnished Metal (highlight) on the “silver” metal areas, and for the gold areas, I mixed this color 1:1 with Ionic-0858 Tarnished Metal (highlight). As for the fabrics, we’ll add white to the colors we used earlier (Ionic-0079 Purple, Ionic-0076 Deep Violet, and Ionic-0096 Phthalo Blue) to highlight the fabrics. We’ll then apply a wash with these same base colors to restore some of the original tone, but this time to achieve greater texture.
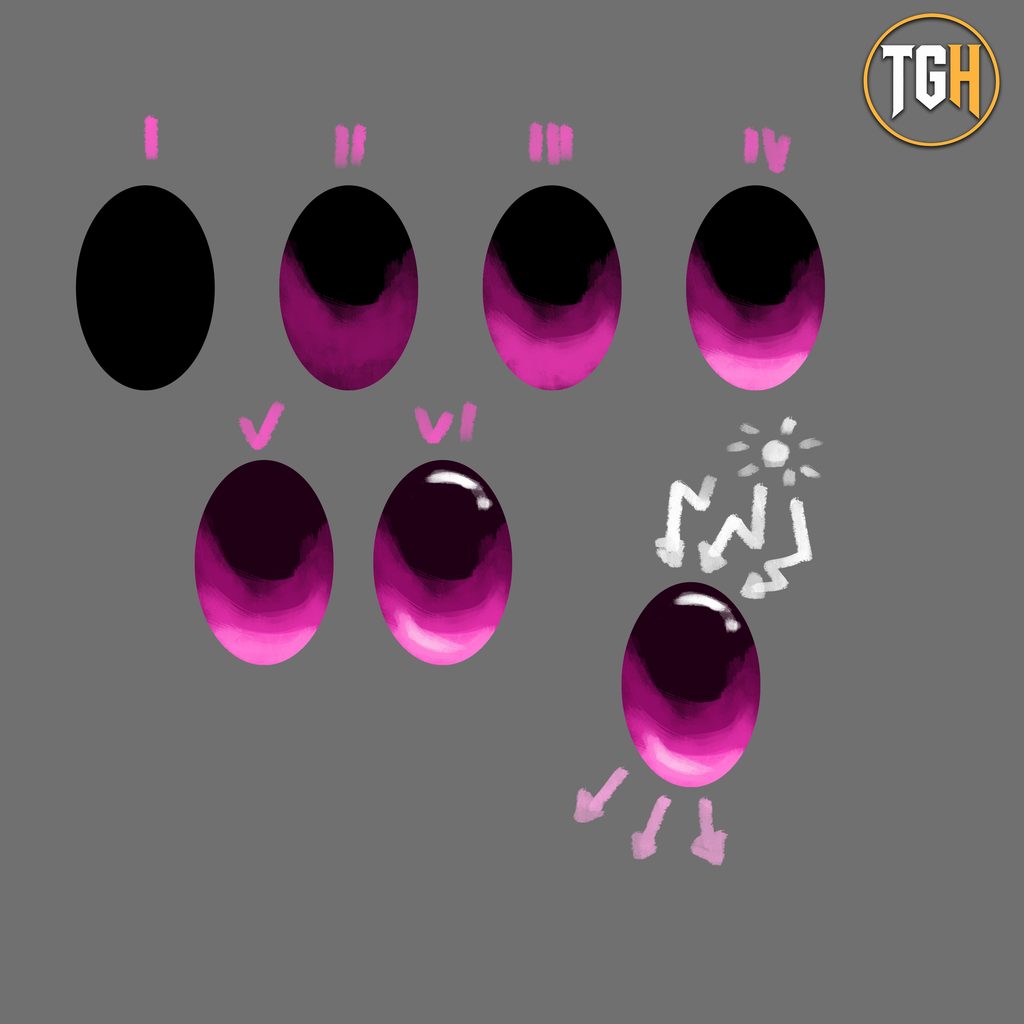
To create the gems and earrings, I first painted the surfaces black. Then I painted the lower area with Ionic-0068 Magenta, then, on top of that same surface (while leaving some of the previous paint visible), I used a new mixture, this time a 1:1:1 ratio of Ionic-0068 Magenta combined with White and Amsterdam Reflex Rose, since fluorescent colors need a light base to stand out much more, as they tend to be transparent despite having good color saturation. Therefore, the next mixture (while preserving a section of the previous paint layer) will be a 1:1 ratio of White mixed again with Amsterdam’s Reflex Rose. To finish this step, we’ll apply only Amsterdam’s Reflex Rose, thinned to a glazing consistency, over the entire gem to create a slightly smoother transition.
As a final touch, we can add a few White dots or lines at the top of the gem (representing where the light enters the gem) and, at the bottom, another 1:1 mixture of White and Reflex Rose by Amsterdam to simulate where the light exits the gem.
Highlights (II) Oil paints and terrain
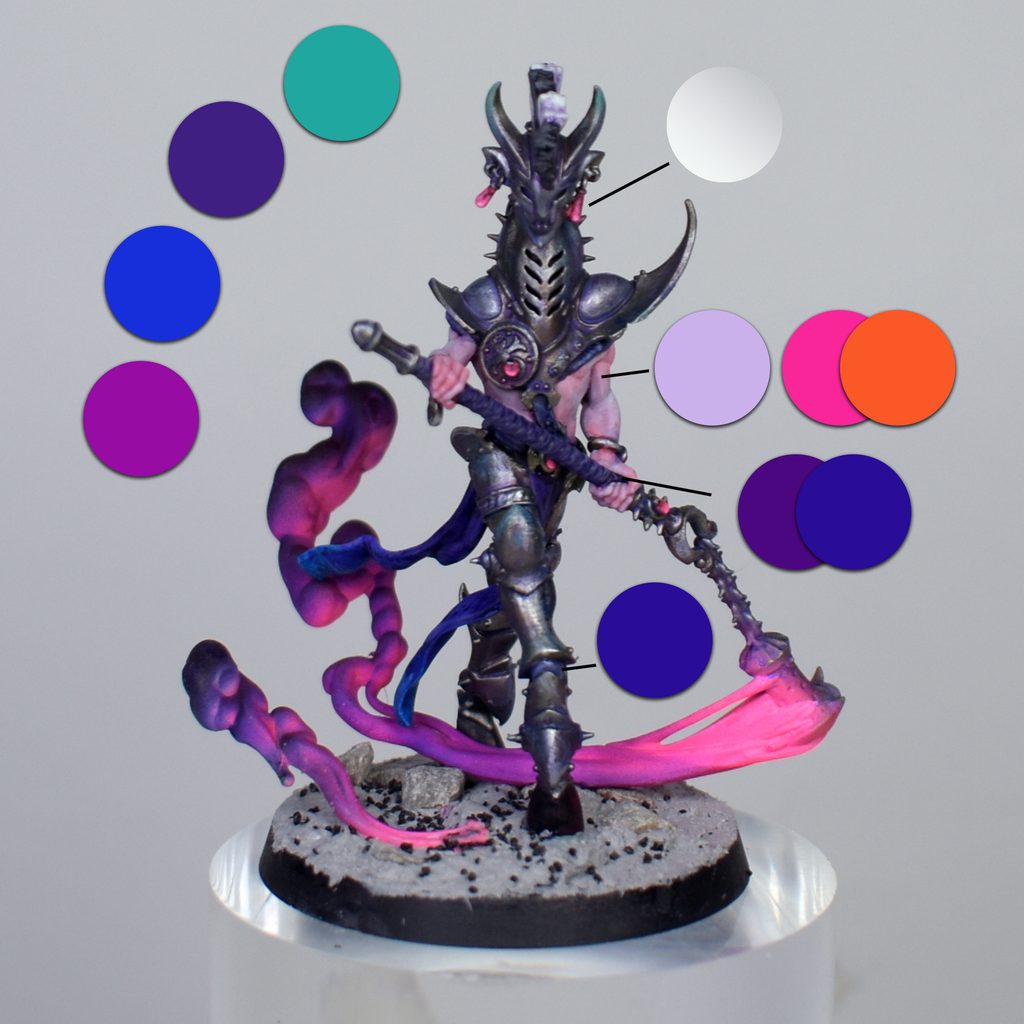
I continue to highlight the figure. For the skin, I apply another layer of color using Ionic-0082 Light Lavender, followed by a thin glaze of a 1:1 mixture of Amsterdam Reflex Rose and Amsterdam Reflex Orange, applied mainly to the hands, elbows, and chest, making sure to leave some of the previous colors visible.
As for the leather, I applied Ionic-0390 Violet Ink, diluted, to the straps and the armor’s leather components. For the leather on the weapon, I also added Ionic-0393 Purple Ink to this color.
At this point, I decided to give it a more “magical” touch by applying different colored oil paints, especially to the armor. I used Titan Violet, Titan Compound Green, Titan Ultramarine Deep, and finally Abteilung Magenta. I thinned all of them with Ammo’s Odorless Enamel Thinner. I applied them one by one to the different metal parts, taking advantage of the fact that they were still wet to apply the next color and ensure they blended together better.
I also applied a gloss varnish to the gems to enhance the contrast between materials and give them a shine.
I’m taking this opportunity to apply a layer of textured soil to the base and add some small rocks of various sizes. (The texture used is Ammo Concrete texture-2158.)
After that, we’ll let both the oil paints and the base dry before moving on to the final step.
Final Touches
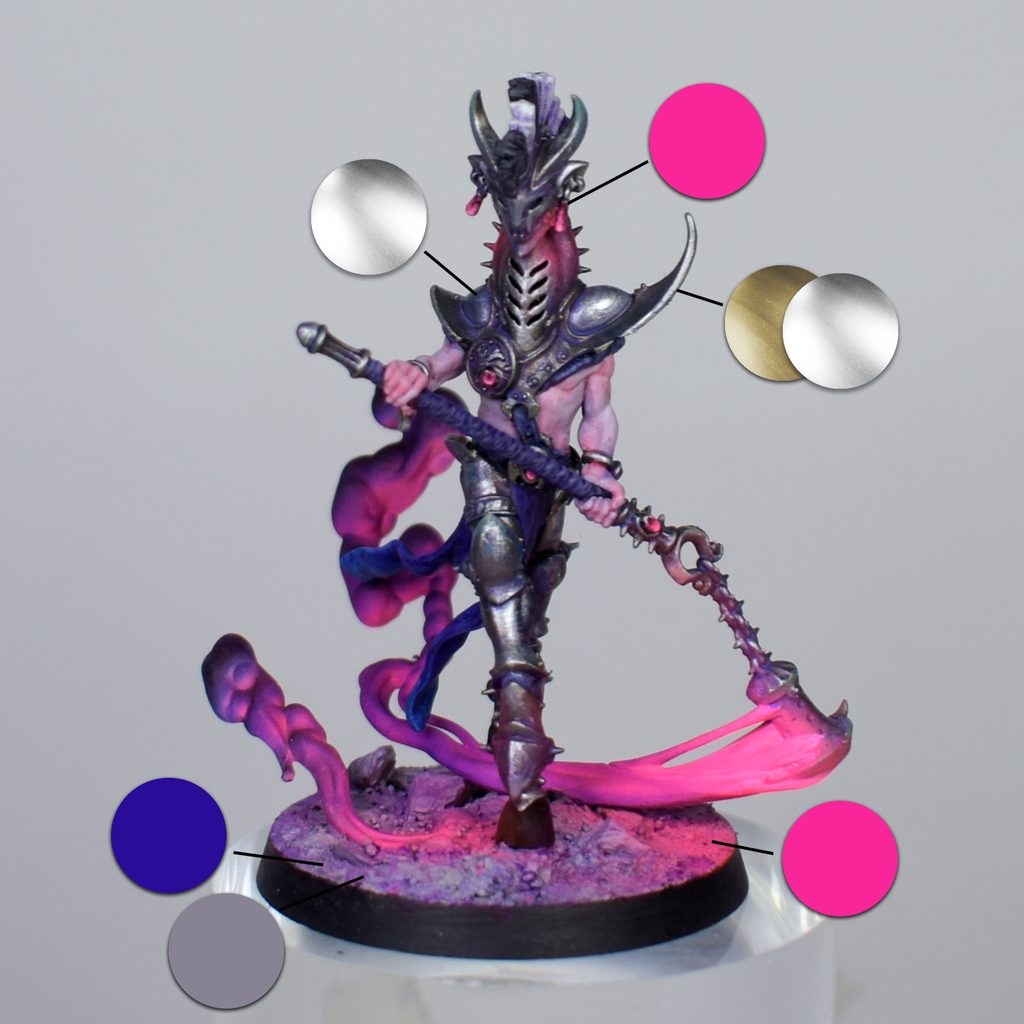
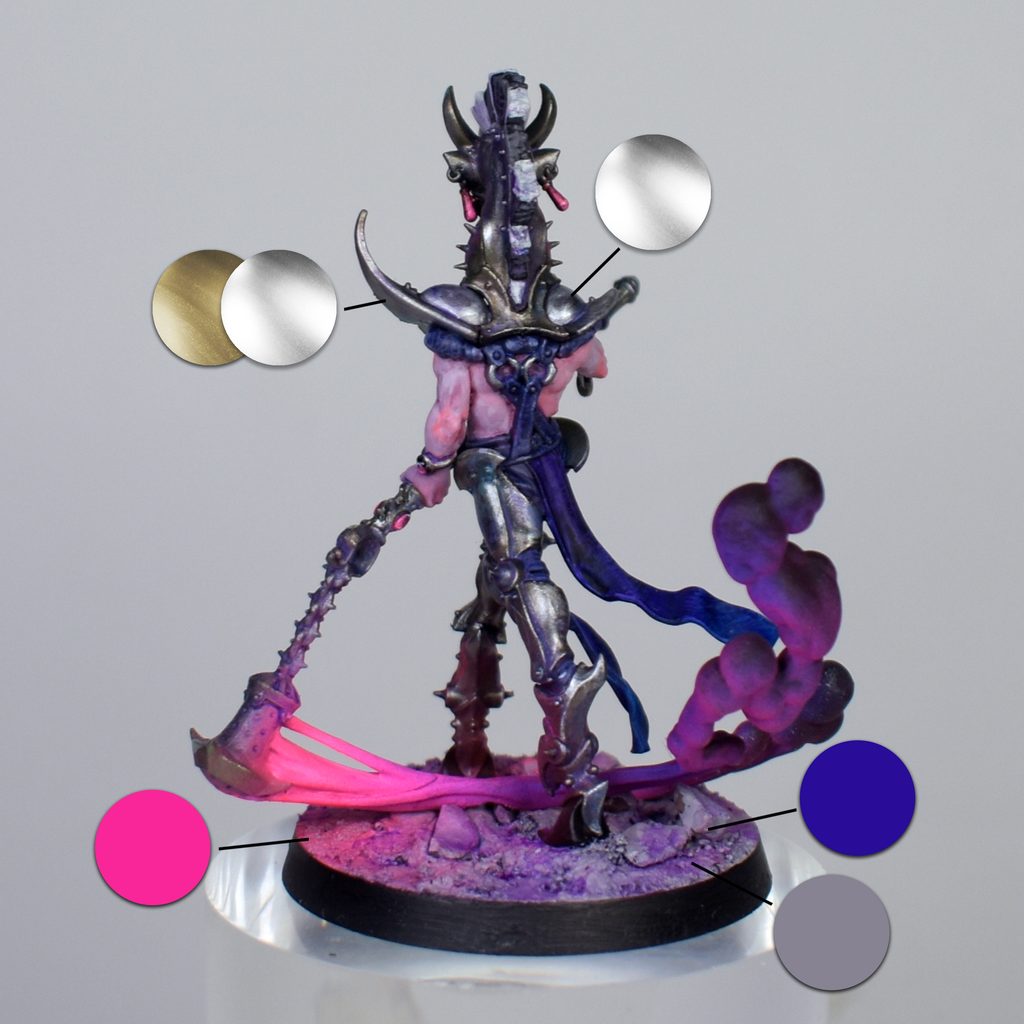
I’m using both Ionic-0859 Burnished Metal (highlight) and Ionic-0858 Tarnished Metal (highlight) again to restore some shine to the metal parts.
I repaint the base with Ionic-0164 Moon Grey, and then apply another wash with Titan Violet oil paint, diluted with enamel thinner.
Using the airbrush, I enhance the fluorescent pink again with Amsterdam’s Reflex Rose, focusing on parts of the armor and base where the highlights will be most noticeable.
Finally, I apply pigments to the base to finish off the figure; specifically, I used Ammo Magenta Pigment-3058 and Ammo Fluor Violet Pigment-3038.
Final pics
I hope you enjoyed the tutorial. With this, I’m kicking off my army of Hedonites of Slaanesh.If you liked this post, or if you have any suggestions for future articles, let us know in the comments!
See you next time, generals!
ekkius.
Would you like to learn more about Age of Sigmar? Are there any topics you’d like us to cover in future articles or videos?
Let us know in the comments! You can also send us your suggestions via our Instagram.
Your feedback helps us keep creating the content you really want to see.

Discover more from The Generals Hub
Subscribe to get the latest posts sent to your email.
Tags: Hedonites of Slaanesh

The Generals Hub
Aquí encontrarás las últimas noticias de Age of Sigmar, mucho hobby, análisis del metajuego, estrategia y contenido para disfrutar al máximo del universo de los Ocho Reinos.
Leave a Reply