

The Generals Hub: Konrad Opravel Conquers the London GT 2026

Today we’re joined by Konrad Opravel, winner of the London GT 2026.
Once again, we’re welcoming a great Disciples of Tzeentch player to the blog, and it’s no coincidence: the faction has been shining week after week on the competitive scene, and Konrad’s result is yet another example of that.
Throughout this article, Konrad will break down the secrets behind his list, take us through each round, his matchups and opponents, and finally share some tips and tricks for all you Tzeentch players out there.
Let’s find out how he managed to conquer the London GT!
Konrad Opravel

I’m a Hungarian National who moved to the UK 2 years ago. With the move I also picked up the hobby Age of Sigmar. I played a few games at the end of 3rd edition but started playing more with the new edition. My first army was Slaves to Darkness, but after a few months I was ready to embrace some change in my life and picked up Tzeentch.
The List
They didn't nerf cities in time… 1990/2000 pts

Disciples of Tzeentch
Mutants and Mad Things
General's Handbook 2026-27
Drops: 3
Spell Lore - Lore of Change
Manifestation Lore - Manifestations of Tzeentch

Battle Tactic Cards: Burning for Vengeance, Siege of Ashes

General's Regiment
Lord of Change (380)
• General
• Silver Summoner
• Cloaked in Wyrdflame
Exalted Flamer of Tzeentch (140)
• Vision of Arcane Sacrifice - (20) Points
Flamers of Tzeentch (130)
Flamers of Tzeentch (130)
Screamers of Tzeentch (80)

Regiment 1
Curseling, Eye of Tzeentch (170)
Chaos Spawn of Tzeentch (60)
Tzaangor Enlightened (400)
• Reinforced

Regiment 2
The Changeling (140)
Blue Horrors and Brimstone Horrors (240)
• Reinforced
Burning Chariot of Tzeentch (120)

Faction Terrain
Argent Shard

Created with Warhammer Age of Sigmar: The App
App: 1.37.0 | Data: 476 The Purpose of the List
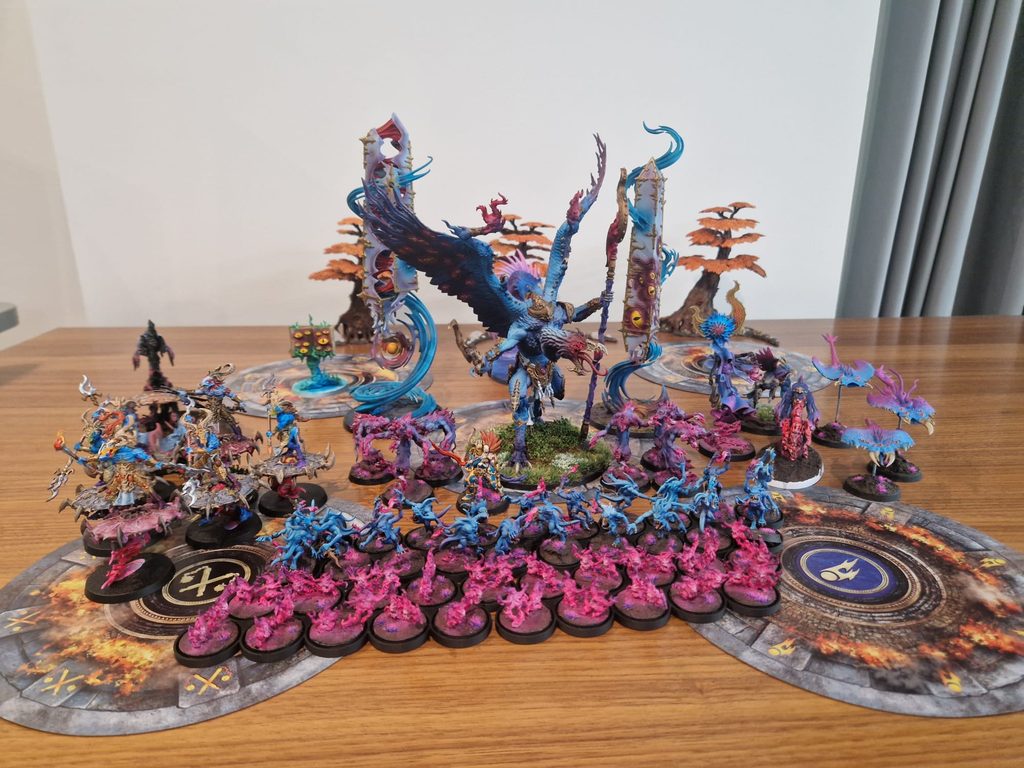
The idea behind Tzeentch is to throw your opponent’s senses off. Your opponent is used to its units doing a certain amount of damage, having a certain tempo to the game, and having a good understanding of how AoS is played. We’re here to throw all of that out the window and make our opponent question everything.
How? The Lord of Change gives out a -1 to hit aura. With four unique casters, we have four shots at Bolt of Tzeentch, which gives out -1 to wound. This usually catches some people off guard. They don’t do that much damage as they are accustomed to.
But there’s more. By throwing in the Chariot and Screamers as bait, opponents will usually spend some resources chasing them down. They think they are making progress by removing them, but since they come back, we aren’t actually falling behind.
On top of this, we have our usual swip-swap mechanics: teleports, faction terrain teleporting, and a pack of Blues that, if you don’t wipe them, come back.
How the List Plays?
The first round is your setup round. Usually, you will fall behind on points a bit, which isn’t bad, as the extra CP helps. You also get some time to build up Fate Points. You get your manifestations up, place the baits, and debuff your opponent’s army.
Round 2 is where you actually start playing. You have two big blocks of damage.
For close-range targets, you can target-fire with nine casts and 80+ shooting attacks, half of which are D3 damage.
Your other big bomb is the Enlightened. With the Lord of Change spell, they essentially move 28 inches, and with the +1 Rend from the Curseling, plus some buffs from the Sigil, they are able to lift the tankiest monsters in the game. They are your glass-cannon assassins and fugitive chasers.
The list has enough damage to lift most armies around Round 4, as long as you don’t lose any Enlightened or the Lord of Change.
London GT 2026
This was my second time going to the London GT, and once again, I had a great time. I met a lot of very friendly and cool people, and had some of my most fun games with some lovely opponents!
The only point of critique I have is that it would be great if they used the latest patch (hence the name of my list). But more on that in Game 5.
Matchups
Round 1 vs Tom Phillips – Stormcast Eternals Sentinels of the Bleak Citadels – 77/52
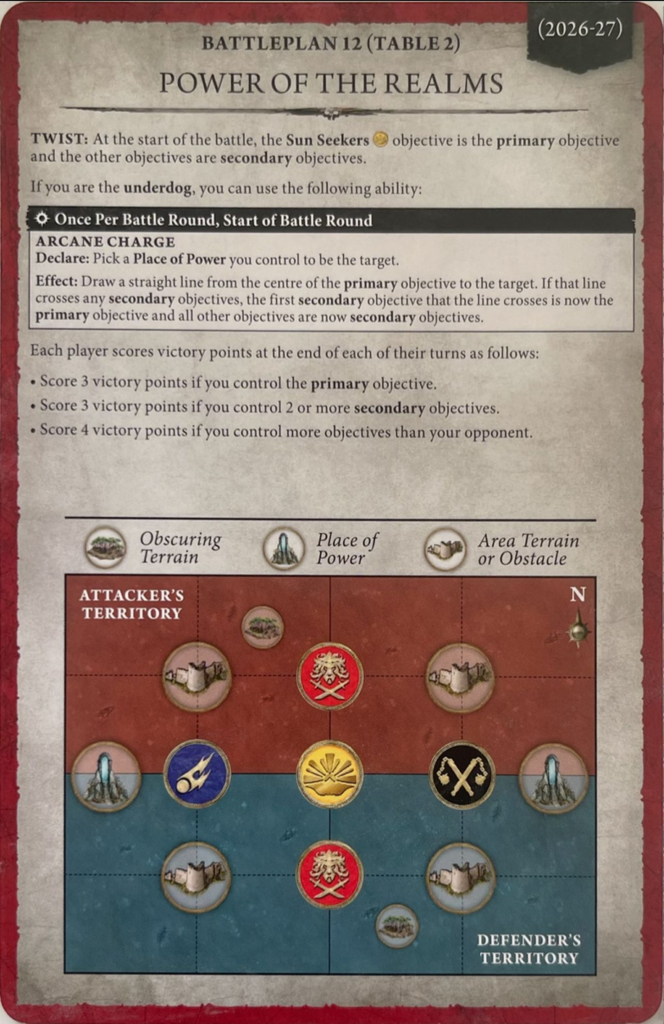
In this matchup, Tzeentch has a fairly big advantage. Stormcast doesn’t have enough wounds to play the long game. Because of this they have to attack me with everything and do a critical amount of damage.
My opponent had three hammers, two reinforced Annihilators, and Krondys. I knew that as long as I didn’t let them all connect in the same turn, I would be fine. As soon as they teleport down onto the board, my shooting is good enough to soften up the Annihilators, and with some pile-in shenanigans, the Enlightened can lift the rest.
I kept feeding Krondys some Screamers, a chariot, and a manifestation. The dragon was well fed and became less inclined to go after my tasty chicken.
Going into Round 4, it was only Krondys left. The spell damage, backed up by shooting and finished off with the Enlightened, managed to lift him in one turn.
Round 2 vs Sean Gorman – Soulblight Gravelords Bacchanal of Blood – 76/71
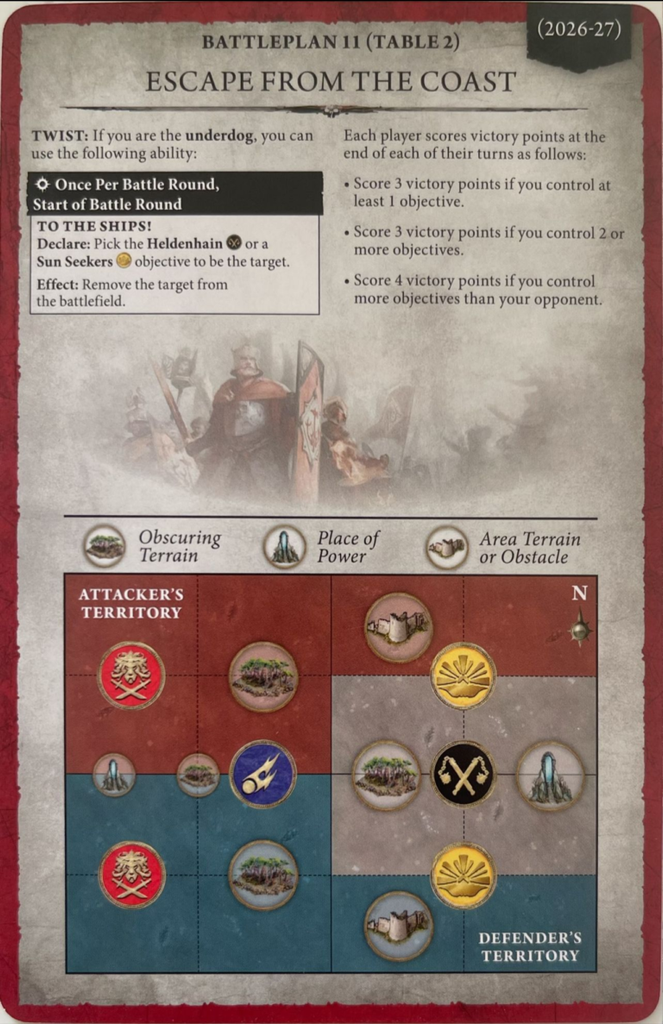
I put all my fast units on the right side—Enlightened, Screamers, and the chariot—with the intention of quickly dominating that side of the board and then using their high mobility to flank the army.
I deployed the rest of the army a bit further back, where I could still get some shooting in while making it fairly difficult for him to hard-engage with everything.
They picked their Fugitive as my Curseling, so on T1 I used Mutant and Mad Things to put it in my opponent’s left corner. The hope was that he would send something big and strong after it, stretching his army further so that it wasn’t everything coming after the Lord of Change. This would buy me time for the cavalry to arrive.
And boy, did I need it.
The Vengorian Lord, alongside 2×20 Barrow Guard, was marching straight towards my Lord of Change, and nothing was stopping them now that they have the ability to move into combat.
At the start of R3, I had the Lord of Change tucked as far into the corner as possible, desperately trying to survive. The only reason the Lord of Change survived R3 was the artifact Cloaked in Wyrdflame.
It survived the assault on just two wounds. From there, I managed to lift most of my opponent’s army, locking in the win as my opponent would no longer be able to complete Siege of Ashes 3 due to a lack of units.
Round 3 vs Dan Sidders – Ironjawz Weirdfist – 67/59
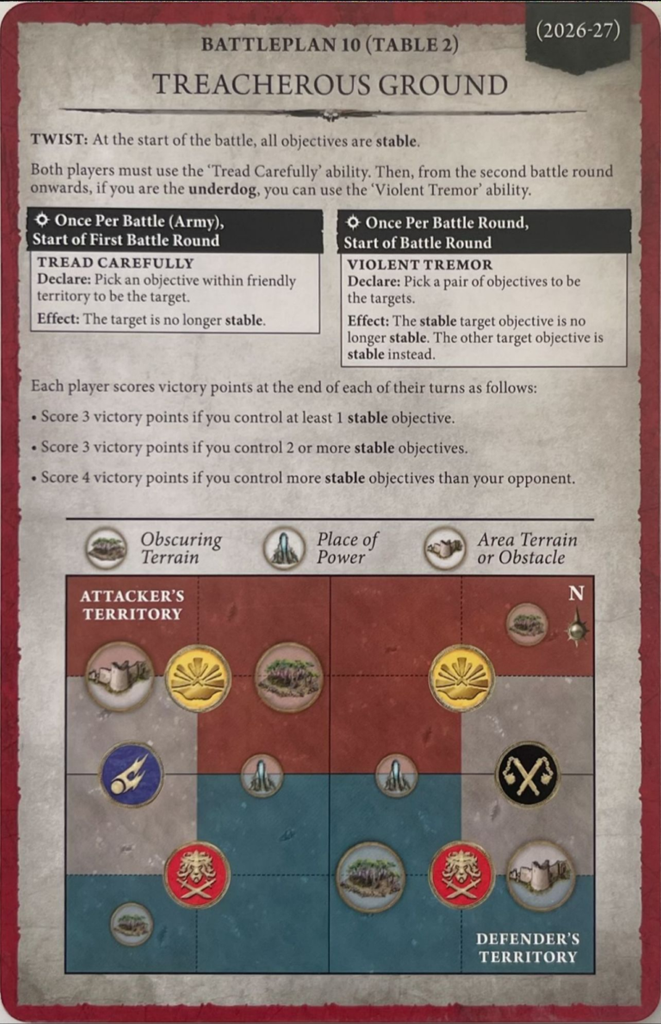
The map was very favourable to me, as this battleplan requires high mobility to stay ahead.
My opponent did an even split across the map, while I deployed 1,790 points on the right side. The intention was to deliberately go underdog, forcing all the active objectives onto the right side and allowing me to focus on lifting my opponent’s army.
The question was simply: can I lift 120 wounds on a 3+ save in time to catch up on score?
Luckily for me, my opponent picked the Curseling as my Fugitive. He should never be able to score it, because with Mutant and Mad Things, I can just teleport to the farthest corner. By the time he gets there, I’ll move to another corner. This meant I knew I could afford to drop a few points early and play to table my opponent.
As my opponent slowly repositioned, the Flamers kept burning everything alive. By the end of R4, there were no more Orcs left.
This is where I climbed back with two 20-point turns and sealed the win.
Round 4 vs Laurie Huggett-Wilde – Sylvaneth Lords of the Clan – 76/58
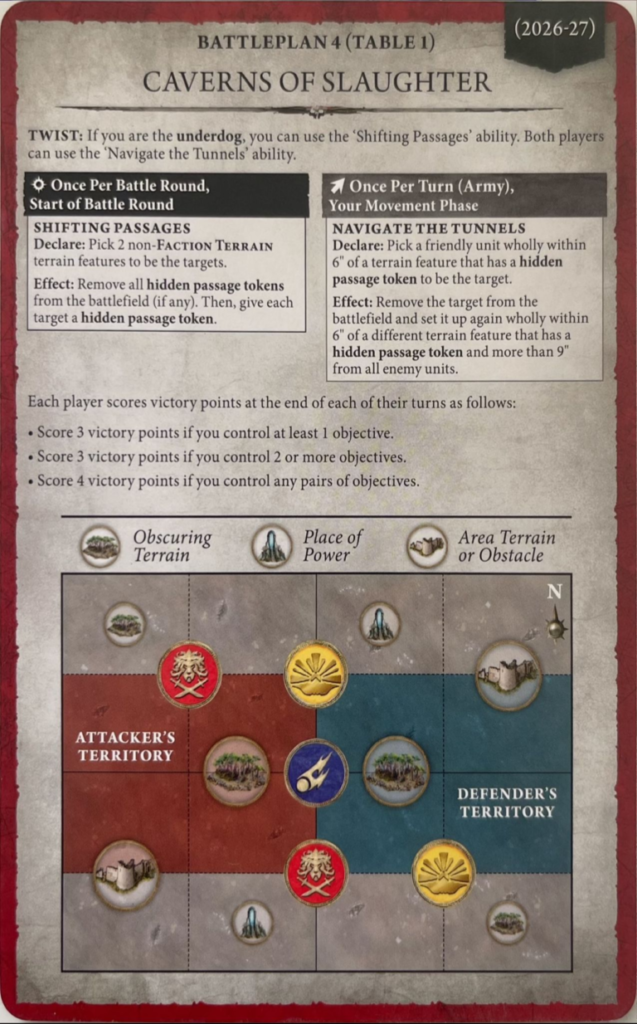
This was my shortest game.
R1 was fairly uneventful, but in R2 my opponent decided to go all out. My army had shifted towards the top side of the map, and my opponent placed a great strategic tree in the back. From there, the swarm came.
Drycha, Durthu, and two of the six Kurnoth Scythes connected with my Lord of Change. My biggest piece of luck was that Alarielle was distracted by my Screamers on the bottom objective.
After the charge phase, every single unit in my army was in combat. It was an all-out brawl.
My opponent opened up with Durthu, and once again, Cloaked in Wyrdflame did wonders. At the end of it, the Lord of Change died, but so did Durthu, Drycha, and three of the Scythes.
On my turn, I managed to shoot the remaining Scythes, take the double turn, and lift everything else besides Alarielle.
From there, I couldn’t kill Alarielle, but I had enough units to place one on every objective and control the objectives across the map.
To be honest, I feel like I was very lucky with the dice in that brawl. This game could have easily gone the other way.
Round 5 vs Jack Armstrong – Cities of Sigmar Zealous Hordes – 65/56
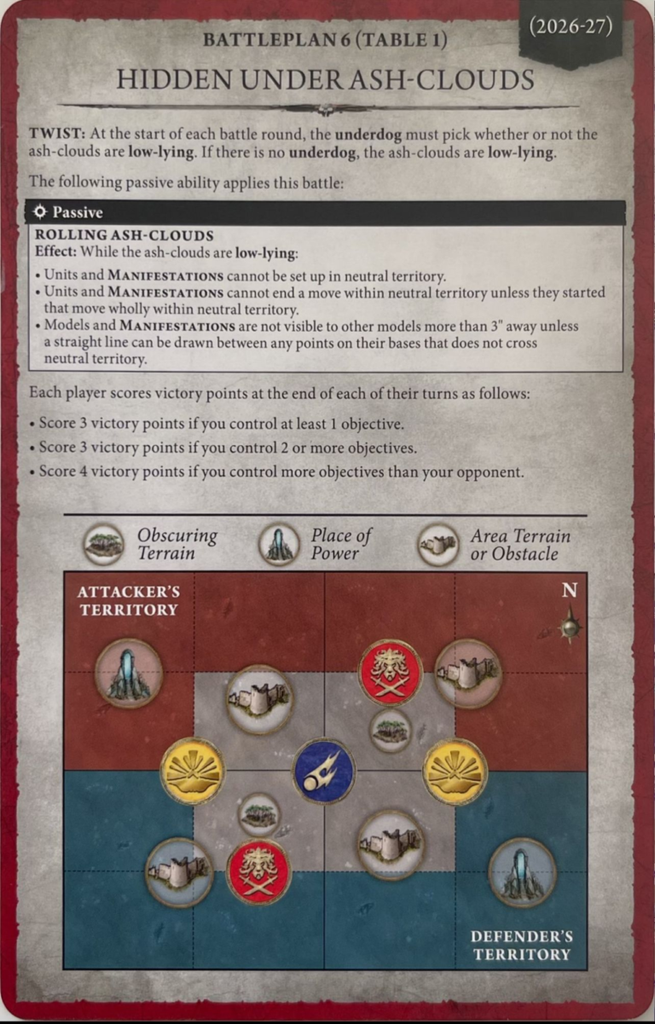
As the name of the list suggests, this was pre-nerf Cities. The 30 Freeguild Cavaliers and the Cannonade Cogfort with double Freeguild Steelhelms definitely made me feel like I had a small chance of winning.
On this map, the centre of the battlefield is inaccessible until the underdog decides to lift the clouds. So my plan was to become the underdog, never lift the fog, and play ring-around-the-rosy with the Cogfort while my Enlightened lifted the Cavaliers one by one with some spell and shooting support.
During deployment, I lost the chance to go second, so I broke up my regiments as much as possible to see how my opponent would deploy. He went for a fairly even split, with two blocks of Cavaliers on one side and the Cogfort plus one block of Cavaliers on the other.
I deployed 1,910 points on the side facing the two blocks of Cavaliers, with the Screamers on the right to tag the objective on T1.
Because of my ability to teleport and deploy on the edges of the map, my opponent could never really abandon one side of the board. If he did, I could simply take the objective. He had to keep the Cavaliers there while slowly walking the Cogfort back.
From there, we started the grind.
The Blues kept doing an amazing job soaking up damage. They would survive just long enough to remultiply into Brimstone and then soak up even more damage in the following rounds.
I was falling behind on points, but with a lucky priority roll at the end of R2, I forced my opponent to take the double turn. That’s when the Cogfort finally arrived in the battle.
Only to find that just four Cavalier models and some foot heroes were still alive.
It did get to shoot the Enlightened with the Big Cannon, but All-out Defence, Shield of Fate giving them a 5+ ward, and some well-spent Fate Points meant only one model died.
Bottom of Round 3, I had one mission: lift the Cogfort.
All spells, all shooting attacks, all charges possible—everything went into the Cogfort.
It lived on one wound after the damage was resolved.
Then I won the priority roll.
The score was 25 for me and 40 for him. At this point, I was far enough behind that I could take the double, stay the underdog, and still be in the game. So I did.
I lifted the Ash Clouds. With that the center objective was now available.
A spell killed the one-wound Cogfort, and from there it was all about whether I could score enough points while denying my opponent enough to pull ahead.
Luckily for me, my army was still largely intact. He wasn’t able to kill the Fugitive or take control of the Hideout, which meant -4 Battle Tactics for him. I could also deny him four points on primary in R5 while scoring 20 myself in both rounds.
That was enough to just barely take the win.
Tips for Fellow Tzeentch Players
Tzeentch is a complex army with a very unique playstyle. It has one of the biggest ranges of playable units, and there are multiple ways to build and play the army.
You will never have the staying power to win an honest fight, so… well… “cheat.”
Use your tricks, teleports, and debuffs to spread your opponent thin across the map, then strike with your hammer unit like a spear into your opponent’s most vulnerable pieces.
Understand that your hammer is very fragile, so don’t be shy about babysitting them with Command Points, Fate Points, spells, Smoke & Mirrors—whatever they need.
Don’t feel bad if you fall behind on points early. The army shines in long, drawn-out battles.
If you want to play an army where, halfway through the game, even you have no idea what you’re doing, but somehow it all works out, then Tzeentch is for you!
Want more Age of Sigmar stats? Check out Good Games Club
Want to know where your faction stands on the tier list? Head over to our Age of Sigmar Tier List
Want to learn more about Age of Sigmar? Is there a topic you’d like us to cover in future articles or videos?
Let us know in the comments! You can also send us your suggestions through our Instagram.
Your feedback helps us keep creating the content you really want to see.

Discover more from The Generals Hub
Subscribe to get the latest posts sent to your email.
Tags: Disciples of Tzeentch

The Generals Hub
Aquí encontrarás las últimas noticias de Age of Sigmar, mucho hobby, análisis del metajuego, estrategia y contenido para disfrutar al máximo del universo de los Ocho Reinos.
Leave a Reply